By: Team F10-2 Since: Sep 2018 Licence: MIT
- 1. Introduction
- 2. Quick Start
- 3. Commands
- 3.1. Viewing help:
help - 3.2. Adding a bike:
addbike - 3.3. Adding a loan:
add - 3.4. Listing all bikes:
listbikes - 3.5. Listing all loans:
list - 3.6. Editing a bike :
editbike - 3.7. Editing a loan:
edit - 3.8. Locating loans by keywords:
find - 3.9. Deleting the chosen bike from the loan book :
deletebike - 3.10. Deleting the chosen loan from the loan book:
delete - 3.11. Change the password of the app:
setpass - 3.12. Returning a loan:
return - 3.13. Locating loans by date of loan:
search - 3.14. Hard reset all loans from loan book :
resetloans - 3.15. Hard reset the entire loan book :
resetall - 3.16. Summarize all the transactions:
summary - 3.17. Listing entered commands:
history - 3.18. Check your email:
checkemail - 3.19. Set your email:
setemail - 3.20. Send reminder email:
remind - 3.21. Exiting the program:
exit
- 3.1. Viewing help:
- 4. Future features
1. Introduction
Introducing LoanBook, the all-in-one free inventory management software that promises to improve the efficiency of your bicycle rental business! It comes out of the box with every feature that your business will require. By parsing commands typed by users, a mouse is no longer required to use the app. Compared to a Graphical User Interface (GUI) or the traditional pen and paper, fast typists will find that LoanBook allows user to manage bicycle loans much faster. LoanBook was built with love together with 5 students in NUS, namely Ang Wei Neng, David Kum, Lim Fong Yuan, Liu Xiaohang and Muhammad Irham.
2. Quick Start
Here is a quick guide to help you set up the LoanBook application on your device.
-
Ensure you have Java version
9or later installed in your computer. -
Download the latest
LoanBook.jarhere. -
Run the .jar file. The GUI should appear in a few seconds.
You should see a textbox near the top of the window with a blinking vertical line. If the textbox says "Enter command here…" instead, click on the box with your mouse.
To ensure that LoanBook is running smoothly, try typing help into the textbox, and then press ENTER to execute it. A new window containing this guide should pop up.
2.1. Graphic User Interface (GUI)
A screenshot of the LoanBook app is shown below:
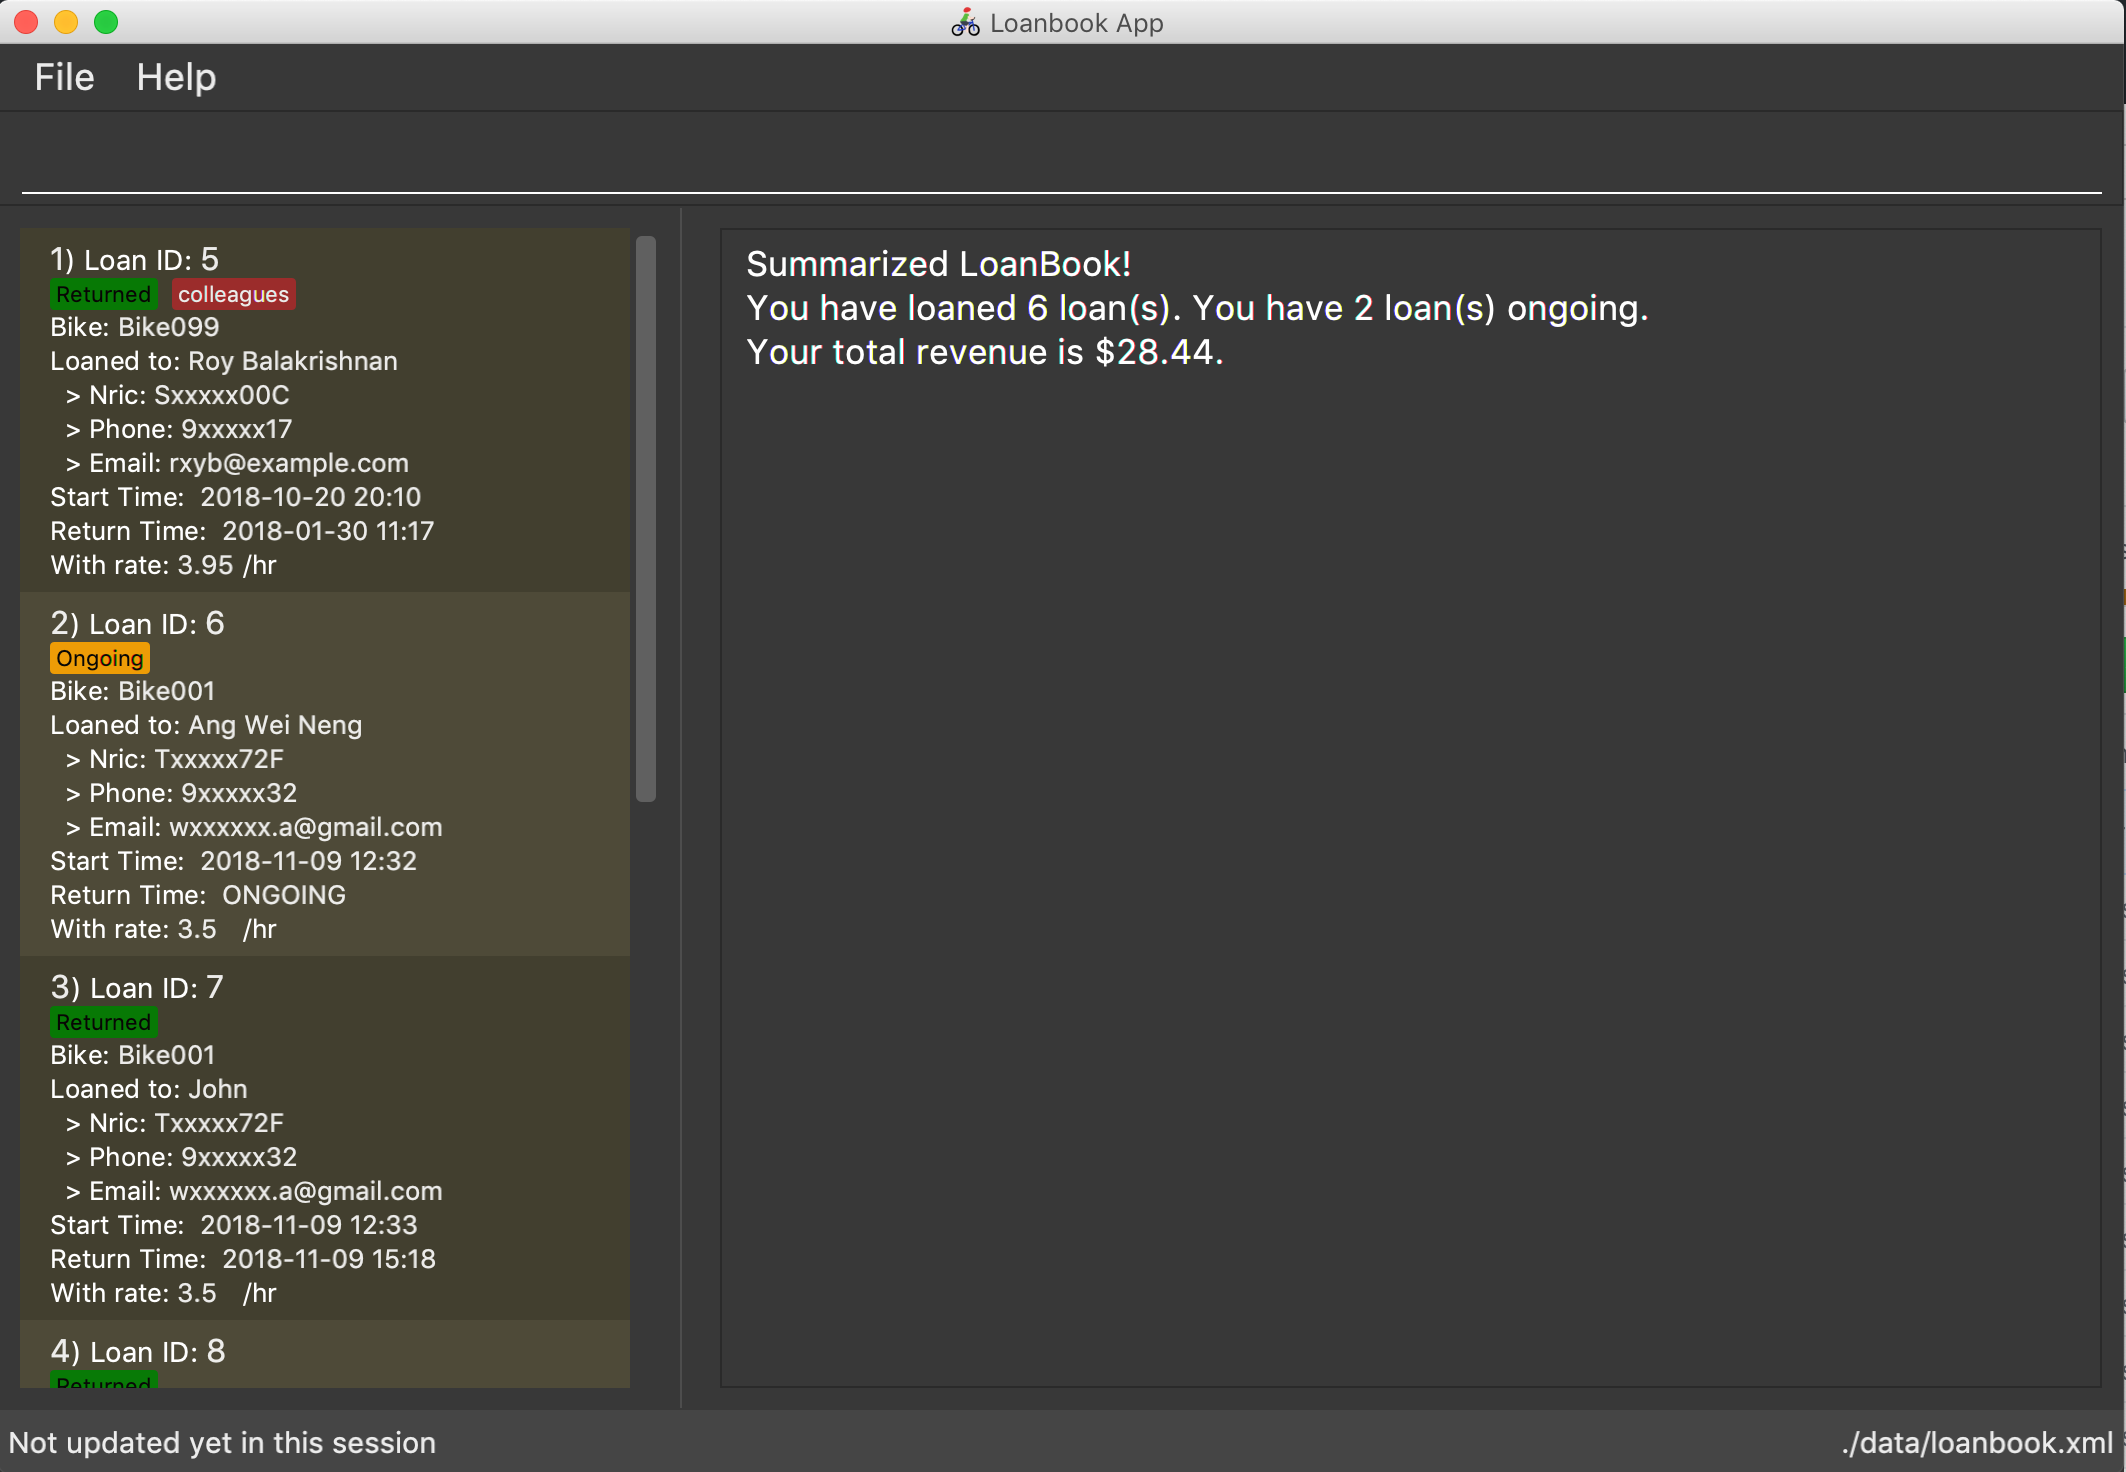
A brief description of each section:
-
At the very top of the window are two dropdown menu s, labelled
FileandHelp. You can access them with the mouse. TheFilemenu allows you to exit LoanBook, while theHelpmenu lets you access this document. -
Right below the dropdown menus is the command box. Here is where you type in the commands to be executed by the app.
-
Below the command box, the space is split horizontally into two sections. The left section is the list panel. Here is where a list of your bikes and loans will appear, together with some individual details on them.
-
The right section is the result display. Whenever you execute a command with the command box, this section will notify you of their outcome by displaying a message.
-
At the bottom of the window is the status bar. It contains two texts. The text on the left displays when was the last time the LoanBook’s data was saved to the hard disk. The text on the right displays the file path of where the LoanBook data is saved, in relation to LoanBook’s root directory. If the terms here confuse you, you can simply ignore this section.
The command box, list panel and result display are what you will be using the most in LoanBook.
| When you are just starting out, the list panel and result display should be empty as there is no information in the LoanBook yet, so do not worry if you do not see anything there. |
2.2. Using Commands
LoanBook uses a Command Line Interface (CLI), which means that it is fully usable with only your keyboard, no mouse required!
When you type in anything on your keyboard, your input should appear in the command box. (If the command box says "Enter command here…" instead, please click on the command box to select it. If you do not have a mouse, press TAB a few times until it is selected.)
The commands in LoanBook follow this format: <KEYWORD> <PARAMETERS…>. As an example, consider the following command: delete i/1 x/a12345
-
deleteis the command’s keyword. The keyword is used to identify which action from the LoanBook is being requested by you. -
i/1 x/a12345specifies the command’s parameters. Parameters are separated by spaces, and each parameter consists of a prefix (e.g.iorx), followed by a forward slash (/), then the value of that parameter (e.g.1ora12345).
| Note that some commands do not use prefixes for their parameters, while others do not even have parameters! Exactly what parameters are needed depends on the specific command, and they are all documented in Section 3, “Commands”. |
Once you are done entering the command, just press ENTER to execute it. LoanBook will process your command and feedback the result to you using the result display.
| At any time, for a more detailed description of any command used, please check out Section 3, “Commands”. LoanBook will also remind you of the correct command format should you type anything in incorrectly. So do not worry, there is plenty of help at every step of the way. |
Now that LoanBook is up and running and you are oriented with its GUI, it is time to set up your data within it.
2.3. Registering Your Bicycles Into LoanBook
Before LoanBook can do anything, it needs to know what bicycles you have at your disposal.
To register a bike into LoanBook, use the following command:
addbike n/BIKE_NAME
where BIKE_NAME is the name of your bicycle. It will be used to identify your bike, so it must be a unique name. Your bicycle’s ID number can be a good fit for this field.
On success, you should see a message in the result display saying: "New bike added: BIKE_NAME Status: Available". If you receive an error, follow the instructions in the result display and try again.
Even though you have successfully registered a bicycle into LoanBook, you might be disappointed that nothing is appearing in the list panel. That is because LoanBook defaults to showing you the list of loans in the list panel, and you currently do not have any. To view the list of bikes instead, use the command listbikes. You should now see a list of the bike(s) that you just keyed in!
|
Simply repeat this process until you have registered all your bikes within LoanBook.
2.4. Renting Out Bicycles
Now that you have some bicycles within LoanBook, you can rent them out using the add command. The format for the add command is as follows:
add n/NAME ic/NRIC p/PHONE e/EMAIL b/BIKE lr/LOANRATE [t/TAG]…
Do not be overwhelmed by the sudden increase in length! Let us take it bit by bit…
-
addis simply the command’s keyword. -
NAMEis the name of the customer who is renting a bike from you, e.g.John Doe. -
NRICis the customer’s NRIC number. -
PHONEis the customer’s phone number, so that you know who to call if your bicycle is not returned on time. -
EMAILis the customer’s email address, so that you can send reminders and e-receipts to them. -
BIKEis the name of the bike that you want to rent out to them. In the previous section, it was mentioned that theBIKE_NAMEthat you specify for a bike is used to identify that bike uniquely; here is where it comes into play. -
LOANRATEis the rate at which you are charging your customer for the bicycle rental, in dollars per hour. This will help your financial calculations later. -
TAGare optional labels that you can tag the loan with. They are simply there to keep better track of your loans, should you wish to use them. You can specify no tags at all, just one tag, or multiple tags (with each tag needing a separatet/prefix).
In summary, most of the parameters you specify here are simply customer-specific data. Once you iron out the details of the rental with them, this command is as easy as any other. Simply fill in the details and you should see a success message: "New loan added: (…)", showing you all the details of the transaction.
Right now, LoanBook should still be displaying the list of bikes. To get it to display the list of loans again, simply use the list command. You should see the new loan you added at the bottom of the list. You can toggle between these two lists at will using the list and listbikes commands.
|
| A further visual cue to help you differentiate whether you are viewing the list of bikes or of loans is that the list of bikes is coloured blue, while the list of loans is coloured yellow-brown. |
2.5. Returning Bicycles
Once your customer is done enjoying themself, it is time to conclude the loan. This is done using the return command:
return i/LIST_INDEX
The LIST_INDEX is simply the index of the loan that you want to return in the list panel. It is not the Loan ID.
If the returning is successful, you should see a message in the result display saying "Loan Returned: (…)" followed by the details of the loan. You will also get to see how much you should charge the customer for renting out your bike for as long as they did.
And using LoanBook is as simple as that!
Of course, LoanBook supports a multitude of additional functionalities that will help to facilitate your bicycle rental management even further. The next section lists all the commands that you can try out once you are comfortable with the basic process above. Good luck and happy renting!
3. Commands
This section contains detailed info on the usage and behaviour for every command in the LoanBook.
Command Format
-
Words in
UPPER_CASEare the parameters to be supplied by the user e.g. inadd b/BIKE_ID,BIKE_IDis a parameter which can be used asadd b/Bicycle. -
All parameters need to be specified in order for the command to work, unless they are in square brackets. e.g. in
add n/LOANER_NAME [t/TAGS],LOANER_NAMEmust be specified, butTAGScan be left out. -
Parameters can be specified in any order.
-
Command words are case-sensitive and should be in all lowercase. Most parameters are case-sensitive too.
-
If you enter the parameters of a command incorrectly, the LoanBook will feedback the correct command format to you.
3.1. Viewing help: help
Provides a list of all commands together with a basic description, how-to-use and example usage for each command.
| This will cause a pop-up window to appear, containing a copy of this User Guide. |
| This is not the only way to get help! If you key in the commands with the wrong format, you will get a prompt in the display box which will give you a brief description of the command. It will also tell you how to use the command correctly. |
Format: help
3.2. Adding a bike: addbike
Adds a bike to the loan book with the following parameters, and displays the bike’s details as confirmation.
Format: addbike n/BIKE_NAME
List of Parameters:
n/BIKE_NAME : Name of the bicycle
BIKE_NAME is used as a bicycle identifier, that is, every bicycle should have a unique bicycle name. As such, BIKE_NAME will be rejected if it matches the name of an existing bike in the LoanBook.
|
Examples:
-
addbike n/A Wonderful Bike -
addbike n/BX-0027
3.3. Adding a loan: add
Adds a loan to the loan book with the following parameters, and displays the transaction along with a LOAN_ID to keep track of the loan.
Format: add n/NAME ic/NRIC p/PHONE e/EMAIL b/BIKE lr/LOANRATE [t/TAG]…
List of Parameters:
n/NAME: Loaner’s name
ic/NRIC: Loaner’s IC
p/PHONE: Loaner’S phone number
e/EMAIL: Loaner’S email address
b/BIKE: Name of bicycle to be rented
lr/LOANRATE: Rate of the loan, in dollars per hour
[t/TAG: Optional Tags to tag the loan]
PHONE and EMAIL should not be blank.BIKE must be the name of a bicycle that has already been registered into the LoanBook.LOANRATE is in dollars per hour.
|
Examples:
-
add n/John Doe ic/T0248272F p/98765432 e/johnd@example.com b/Bike001 lr/3.5 t/friends t/owesMoney -
add n/James Ho ic/T0248272F p/91234567 e/jamesh@example.com b/Bike001 lr/3.5
|
The best part about this is you do not even need to key in the time that you created this loan! LoanBook does the timing for you! Simple isn’t it? |
3.4. Listing all bikes: listbikes
Shows a list of all registered bicycles in the LoanBook.
Format: listbikes
3.5. Listing all loans: list
Shows a list of all loans in the LoanBook.
Format: list
3.6. Editing a bike : editbike
To keep the system updated with any changes in the bicycles, this command allows details of a bicycle to be edited.
Format: editbike BIKE_NAME [n/NEW_BIKE_NAME]
-
At least one of the optional fields must be provided.
-
Existing values will be updated to the input values. Any values not specified in the command will be unchanged.
-
You cannot edit a bike’s name to be the same as another existing bike in the LoanBook.
Examples:
-
editbike Bike 1 n/Bike-001
For the bicycle named "Bike 1", its name is changed to "Bike-001", as long as "Bike-001" isn’t already the name of another registered bicycle.
3.7. Editing a loan: edit
In case a wrong entry is keyed in, or the customer changes their mind, this command allows details of a loan entry to be edited.
Format: edit INDEX (must be a positive integer) [n/NAME] [ic/NRIC] [p/PHONE] [e/EMAIL] [b/BIKE] [lr/LOANRATE] [t/TAG]…
List of Parameters:
[n/NAME: Optional edited loaner’s name] ()
[ic/NRIC: Optional edited loaner’s NRIC] (Optional)
[p/PHONE: Optional edited loaner’s phone number] (Optional)
[e/EMAIL: Optional edited loaner’s email] (Optional)
[b/BIKE: Optional edited bicycle name] (Optional)
[lr/LOANRATE: Optional edited of the loan, in dollars per hour] (Optional)
[t/TAG: Optional edited tags of the loan] (Optional)
Examples:
-
edit 1 p/91234567 e/johndoe@example.com
For the loan at index 1, changes the loaned object from whatever it was before to Bicycle-017. -
edit 1 n/James Tan p/90010090 e/jamest@example.com lr/144
For the loan at index 1, changes the customer to James Tan, who has the specified contact details, to the rate of $144 per hour.
|
We do not allow editing of the loan’s start time or the return time because we want you to be able to use our application as an auditing tool. We hope that this can then simplify the management of your business. |
| At least one of the above fields has to be included. If not, LoanBook will not be able to parse your command! |
3.8. Locating loans by keywords: find
Finds loans whose customers' names contain any of the given keywords.
Format: find KEYWORD [MORE_KEYWORDS]
List of Parameters:
The keywords you you want to search for.
Note that for this command, there is no prefix that you need to type. Just separate the keywords with spaces.
Examples:
-
find John
ReturnsjohnandJohn Doe -
find Betsy Tim John
Returns any loan having namesBetsy,Tim, orJohn
| You need to provide at least one keyword. If not, LoanBook will not be able to parse your command! |
3.9. Deleting the chosen bike from the loan book : deletebike
Deletes a bike from the loan book.
Format: deletebike n/BIKE_NAME x/CURRENT_PASSWORD
| (Coming in v2.0) The command will be rejected if there are any ongoing loans that use that bicycle. Return or delete those loans first. |
Examples:
-
delete n/Bike 1 x/a12345
Deletes the bicycle with the name of "Bike 1".
3.10. Deleting the chosen loan from the loan book: delete
Delete the loan from the loan book. If you want to delete one loan, use delete i/LIST_INDEX x/CURRENT_PASSWORD.
Due to delete modifying transactional summary, it is a critical command and hence elevation is required hence the password field.
Format: delete i/LIST_INDEX x/CURRENT_PASSWORD
List of Parameters:
i/LIST_INDEX: Index of the loan, in the left hand side display.
x/CURRENT_PASSWORD: Password used in the LoanBook.
|
The default password for the app is |
Examples:
-
delete i/1 x/a12345
Deletes the loan with that has been indexed at position 1.
3.11. Change the password of the app: setpass
This command changes the current password of the app. This allows you to use a different password in the event that the old password was compromised. Simply follow the example screenshot below:
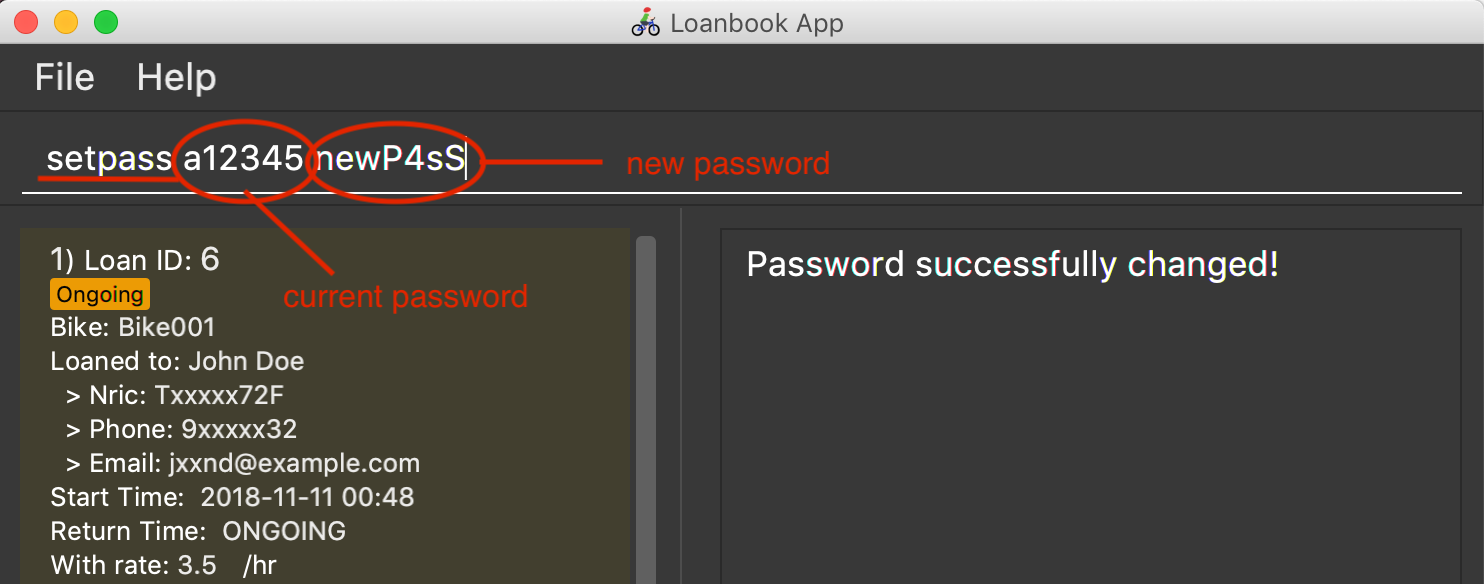
Format: setpass CURRENT_PASSWORD NEW_PASSWORD
List of Parameters:
The old and new passwords of the application.
Note that you only need to use spaces to seperate the two passwords. There is no prefix for this command!
The default password for the app is a12345. To change the default password, execute the command: setpass a12345 <newpass>.
|
Examples:
-
setpass a12345 n3wP4sS
Set the password of the app ton3wP4sS.
3.12. Returning a loan: return
So how do you even return a loan that you have loaned out? You can do so with this simple command! In fact, we see your pains trying to calculate the amount payable on a calculator, so we decided to help you out by doing all the number crunching for you.
This command marks a loan as returned based on LIST_INDEX and automatically prints out the amount payable. The amount payable will be prorated and rounded down to the nearest minute.
Format: return i/LIST_INDEX
List of Parameters:
i/LIST_INDEX: Index of the loan, in the left hand side display.
|
We choose to do this because when we get down to seconds, the difference in the earnings you will get is going to be on the order of a fraction of cents. We hope that by doing this, your business would not seem to be very petty about the money. Also, this would be good for your business, as customers will not feel that they have been ripped off the cost of renting a bike for an extra minute just because you took 5 seconds to log their return details! :) |
Do note that you will have to list out all the loans in order, or search for a particular loan that you would like to return. From there, you need to key in the index number of the loan as a parameter into this command.
The number crunching will work for any type of currency, however it is optimised for dollar amounts. The display also uses the dollar sign and will give you the output to 2 decimal places.
|
Do be careful to note that it is the loan INDEX that you are keying into the program. Please do not key in the LoanID instead! 
|
|
This command is currently not undoable. Please be careful to double check that you are returning the correct loan! We are working on fixing this issue! Do look forward to seeing this new functionality in the next release of LoanBook, version 2.0! |
Examples:
-
return i/1
Marks the loan that has been indexed at position 1 as returned. Also automatically prints out the amount payable based on loan time and rate. -
return i/55
Marks the loan that has been indexed at position 55 as returned. Also automatically prints out the amount payable based on loan time and rate.
3.13. Locating loans by date of loan: search
Populate all loans that were created between the range provided. If you want to search for loans created within a given period for loan tracking, simply enter the command, as shown in the screenshot below:
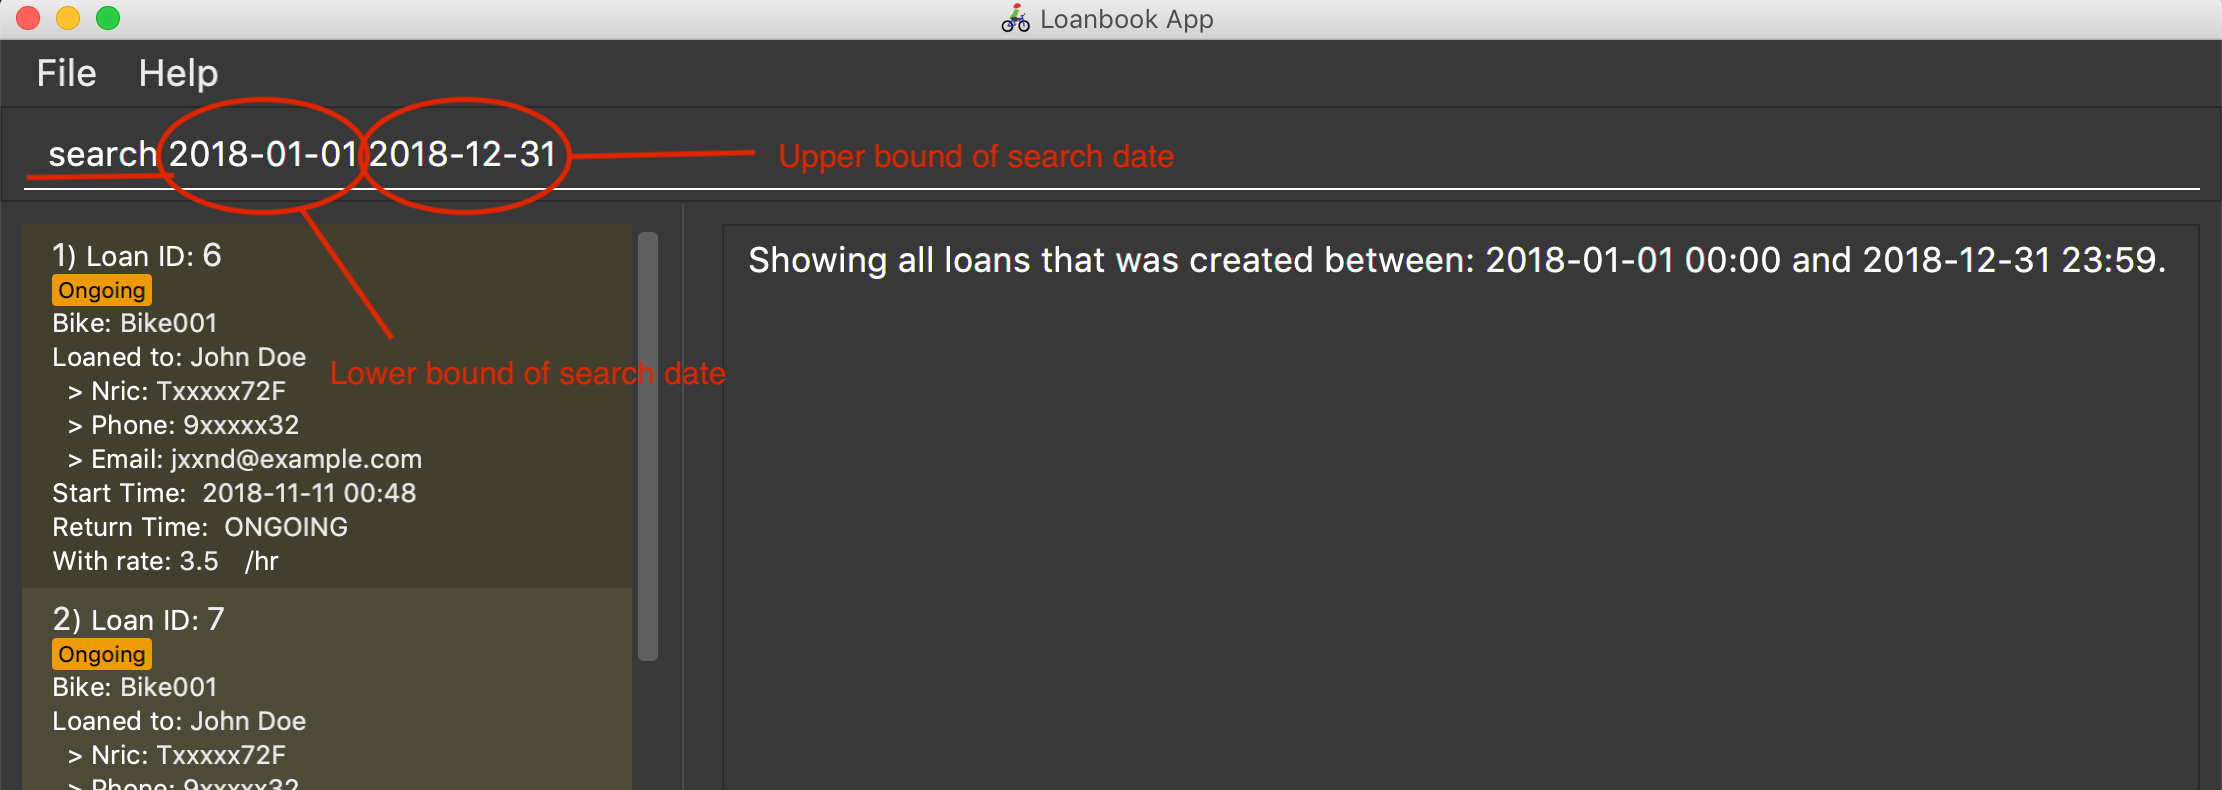
Format: search START_DATE END_DATE
List of Parameters:
START_DATE and END_DATE: The date range in which you want to search for.
Note that you only need to use spaces to seperate the two dates. There is no prefix for this command!
Examples:
-
search 2018-01-01 2018-01-01
Search for loans created on 2018-01-01. -
search 2018-01-01 2018-01-02
Searches for loans created between 2018-01-01 and 2018-01-02, inclusive.
3.14. Hard reset all loans from loan book : resetloans
Removes all loans from the loan book and resets the Loan ID counter. This operation requires password authentication.
Format: resetloans x/CURRENT_PASSWORD
List of Parameters:
x/CURRENT_PASSWORD: Password used in the LoanBook.
Example:
-
resetloans x/a12345
|
This operation will not modify the bicycles in the Loan Book. To reset the entire loan book, including the bicycles, see the |
|
This operation will erase the data of ALL loans! Do this at your own peril. |
3.15. Hard reset the entire loan book : resetall
Resets the entire loan book. This includes the removal of all loans and bikes from the loan book and the Loan ID counter being reset. This operation requires password authentication.
Format: resetall x/CURRENT_PASSWORD
List of Parameters:
x/CURRENT_PASSWORD: Password used in the LoanBook.
Example:
-
resetall x/a12345
|
This operation will erase the data of ALL loans and bikes! Do this at your own peril. |
3.16. Summarize all the transactions: summary
Do you want to find out at a glance how much money your business has collected? Or maybe out of all the bicycles you have, how many are currently loaned out? Here’s the command for you.
Format: summary
The summary function would display the statistics of all your loans in the display box on the right of the application. There, you will find the following statistics:
-
Total number of ongoing loans
-
Total number of loans ever taken out
-
Total revenue from your loan service
|
Current implementations would only allow the summary of the above statistics. However, the LoanBook Team is looking to implement more summary items into the above summary. |
|
The summary feature may take a while to run, especially when you have many loans that you have made in the past. Please allow about a second for it to process. |
3.17. Listing entered commands: history
Lists all the commands that you have entered in reverse chronological order.
Format: history
|
3.18. Check your email: checkemail
Checks whether you have set your email or not, and displays the censored email address if you have set it before.
Format: checkemail
3.19. Set your email: setemail
Sets the email address to send reminder emails from.
Format: setemail e/NEWEMAIL x/PASSWORDFORAPP
List of Parameters:
e/NEWEMAIL: The new user email that you want to set to the app.
x/PASSWORDFORAPP: The password you set for the app. Not your email password.
Some things to take note of for first time users:
-
NEWEMAILcannot the same as the user email you have already set to the app. -
NEWEMAILmust be a valid Gmail address.
| Only Gmail is accepted! |
Examples:
-
setemail e/new.email@gmail.com x/a12345
3.20. Send reminder email: remind
Sends a reminder email to the customer.
Format: remind pw/EMAILPASSWORD id/LOAN_ID
List of Parameters:
pw/PASSWORD: Password of the email address you are sending the messages from.
id/LOAN_ID: LoanID of the loan you want to remind
-
LOANIDis the ID of the loan, not the index. -
EMAILPASSWORDmust be correct.
|
[IMPORTANT] Before using this command, please go to Less Secure Apps , enable it and restart the app! However! If your help page does not respond when enabling, please copy this link: https://www.google.com/settings/security/lesssecureapps and access it in your browser. Then enable the less secure app setting and refresh the setting page! |
| [IMPORTANT] Please do not connect to eduroam network when using this functionality! |
Examples:
-
remind pw/samplepassword id/0
3.21. Exiting the program: exit
Exits the program.
Format: exit
4. Future features
The following are a list of features that the team will implement in version 2.0.
4.1. Allow a log in system that require a username and password
This will be done with a login page that requires users to log in before having access to the app’s feature.
-
This allows separation of password from command argument.
-
This solves the issue of users having to type their password repeatedly when executing multiple commands that require a password.
-
This prevents any password being entered on the command line from showing when users view command history.
4.2. Reset password
-
This allows users to reset their password by receiving a new password via email.
4.3. Prevent some commands from showing in the command history.
Currently, commands that require a password input will be exposed to the user when they view command history. This will will be resolved in v2.0.