By: Team F10-2 Since: Sep 2018 Licence: MIT
1. Setting up
This section describes the necessary dependencies required to work on the application.
1.1. Prerequisites
-
JDK
9or laterJDK 10on Windows will fail to run tests in headless mode due to a JavaFX bug. Windows developers are highly recommended to use JDK9. -
IntelliJ IDE
IntelliJ by default has Gradle and JavaFx plugins installed.
Do not disable them. If you have disabled them, go toFile>Settings>Pluginsto re-enable them.
1.2. Setting up the project in your computer
-
Fork this repo, and clone the fork to your computer
-
Open IntelliJ (if you are not in the welcome screen, click
File>Close Projectto close the existing project dialog first) -
Make sure the correct JDK version is set up for Gradle
-
Click
Configure>Project Defaults>Project Structure. A window titled 'Project Structure for New Projects' will pop up -
Under the "Project SDK" heading, select the correct JDK version (JDK 9 or later).
-
If the correct version does not appear in the drop-down list, click
New…>JDK, then select the directory folder of the JDK, then clickOK.
For Windows, the default installation directory would beC:\Program Files\Java\jdk-[version-number]
-
-
Click
OKto accept the settings and close the window.
-
-
Click
Import Project -
Locate the
build.gradlefile in this project’s root directory on your computer and select it. ClickOK. A window titled 'Import Project from Gradle' will pop up -
Click
OKto accept the default settings. Gradle will now start building your project. Wait a short while for it to complete (it will saymain: sync finishedin IntelliJ’s Build tab when it is done) -
Open a console and run the command
gradlew processResources(Mac/Linux:./gradlew processResources). It should finish with theBUILD SUCCESSFULmessage.
This will generate all resources required by the application and tests. -
Open
XmlAdaptedLoan.javaandMainWindow.javaand check for any code errors-
Due to an ongoing issue with some of the newer versions of IntelliJ, code errors may be detected even if the project can be built and run successfully
-
To resolve this, place your cursor over any of the code section highlighted in red. Press ALT+ENTER, and select
Add '--add-modules=…' to module compiler optionsfor each error
-
-
Repeat this for the test folder as well (e.g. check
XmlUtilTest.javaandHelpWindowTest.javafor code errors, and if so, resolve it the same way)
1.3. Verifying the setup
-
Run the
loanbook.MainAppand try a few commands -
Run the tests to ensure they all pass.
1.4. Configurations to do before writing code
1.4.1. Configuring the coding style
This project follows oss-generic coding standards. IntelliJ’s default style is mostly compliant with ours but it uses a different import order from ours. To rectify,
-
Go to
File>Settings…(Windows/Linux), orIntelliJ IDEA>Preferences…(macOS) -
Select
Editor>Code Style>Java -
Click on the
Importstab to set the order-
For
Class count to use import with '*'andNames count to use static import with '*': Set to999to prevent IntelliJ from contracting the import statements -
For
Import Layout: The order isimport static all other imports,import java.*,import javax.*,import org.*,import com.*,import all other imports. Add a<blank line>between eachimport
-
Optionally, you can follow the UsingCheckstyle.adoc document to configure Intellij to check style-compliance as you write code.
1.4.2. Updating documentation to match your fork
After forking the repo, the documentation will still have the SE-EDU branding and refer to the se-edu/addressbook-level4 repo.
If you plan to develop this fork as a separate product (i.e. instead of contributing to se-edu/addressbook-level4), you should do the following:
-
Configure the site-wide documentation settings in
build.gradle, such as thesite-name, to suit your own project. -
Replace the URL in the attribute
repoURLinDeveloperGuide.adocandUserGuide.adocwith the URL of your fork.
1.4.3. Setting up CI
Set up Travis to perform Continuous Integration (CI) for your fork. See UsingTravis.adoc to learn how to set it up.
After setting up Travis, you can optionally set up coverage reporting for your team fork (see UsingCoveralls.adoc).
| Coverage reporting could be useful for a team repository that hosts the final version but it is not that useful for your personal fork. |
Optionally, you can set up AppVeyor as a second CI (see UsingAppVeyor.adoc).
| Having both Travis and AppVeyor ensures your App works on both Unix-based platforms and Windows-based platforms (Travis is Unix-based and AppVeyor is Windows-based) |
1.4.4. Getting started with coding
When you are ready to start coding, you may move on to Section 2.1, “Architecture” to get some sense of the overall design.
2. Design
This section describes the implementation of the application.
2.1. Architecture
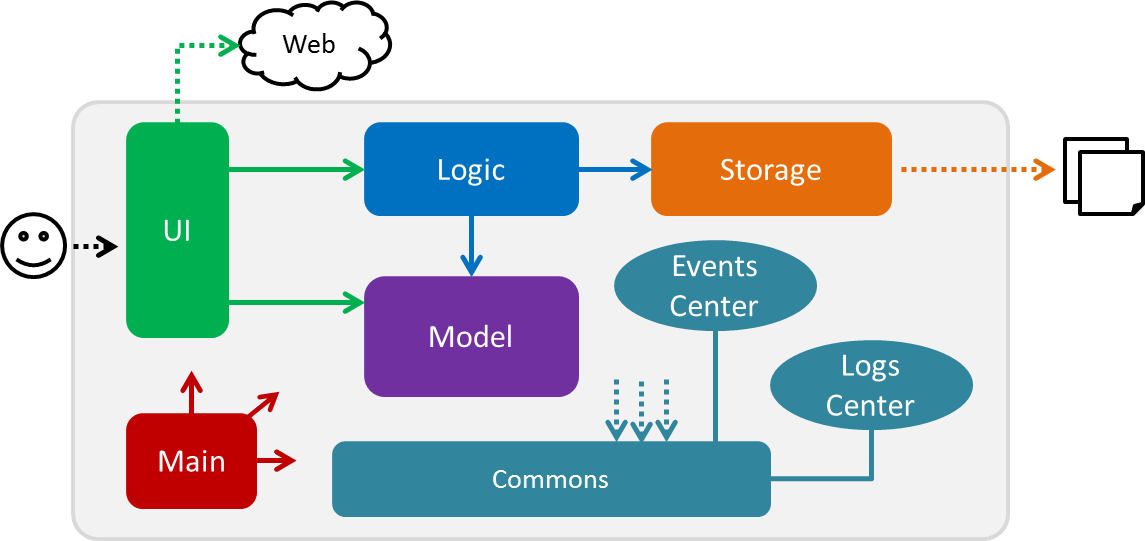
The Architecture Diagram given above explains the high-level design of the App. Given below is a quick overview of each component.
The .pptx files used to create diagrams in this document can be found in the diagrams folder. To update a diagram, modify the diagram in the pptx file, select the objects of the diagram, and choose Save as picture.
|
Main has only one class called MainApp. It is responsible for,
-
At app launch: Initializes the components in the correct sequence, and connects them up with each other.
-
At shut down: Shuts down the components and invokes cleanup method where necessary.
Commons represents a collection of classes used by multiple other components. Two of those classes play important roles at the architecture level.
-
EventsCenter: This class (written using Google’s Event Bus library) is used by components to communicate with other components using events (i.e. a form of Event Driven design) -
LogsCenter: Used by many classes to write log messages to the App’s log file.
The rest of the App consists of four components.
Each of the four components
-
Defines its API in an
interfacewith the same name as the Component. -
Exposes its functionality using a
{Component Name}Managerclass.
For example, the Logic component (see the class diagram given below) defines it’s API in the Logic.java interface and exposes its functionality using the LogicManager.java class.
Events-Driven nature of the design
The Sequence Diagram below shows how the components interact for the scenario where the user issues the command delete i/1 x/a12345.
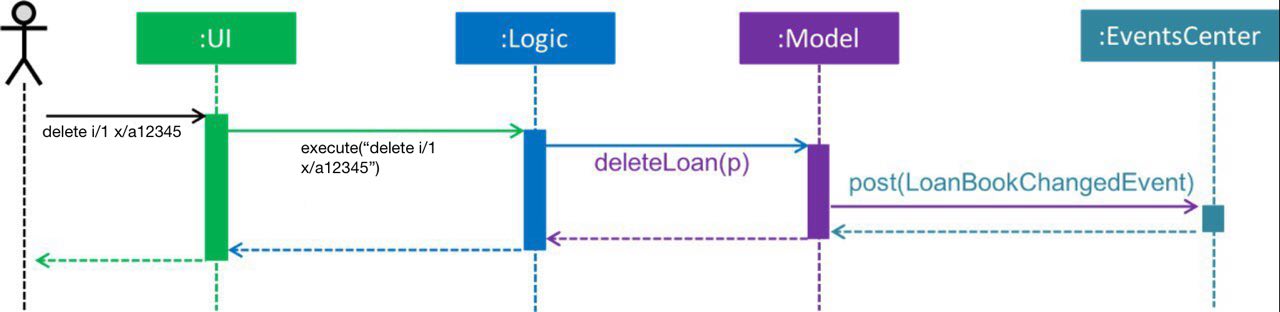
delete i/1 x/a12345 command (part 1)
Note how the Model simply raises a LoanBookChangedEvent when the Loan Book data are changed, instead of asking the Storage to save the updates to the hard disk.
|
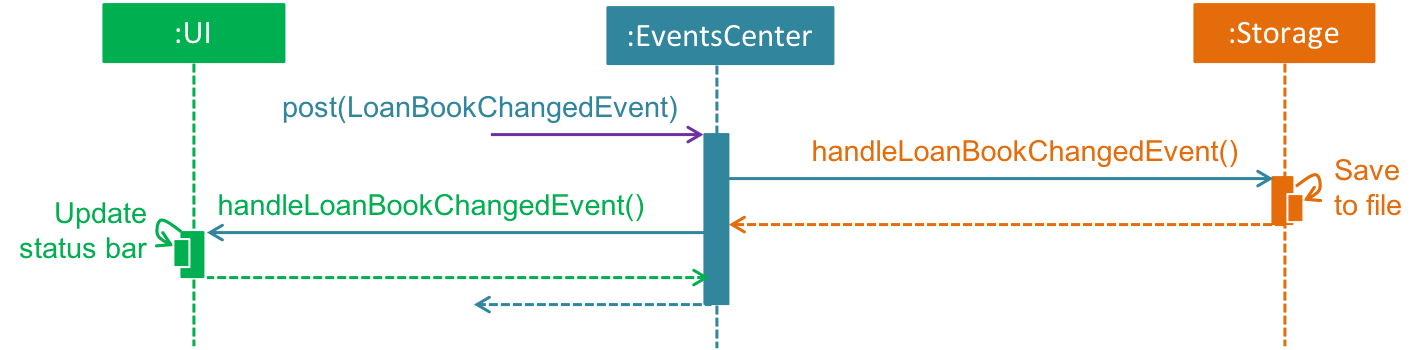
The diagram below shows how the EventsCenter reacts to that event, which eventually results in the updates being saved to the hard disk and the status bar of the UI being updated to reflect the 'Last Updated' time.
delete i/1 x/a12345 command (part 2)
Note how the event is propagated through the EventsCenter to the Storage and UI without Model having to be coupled to either of them. This is an example of how this Event Driven approach helps us reduce direct coupling between components.
|
The sections below give more details of each component.
2.2. UI component
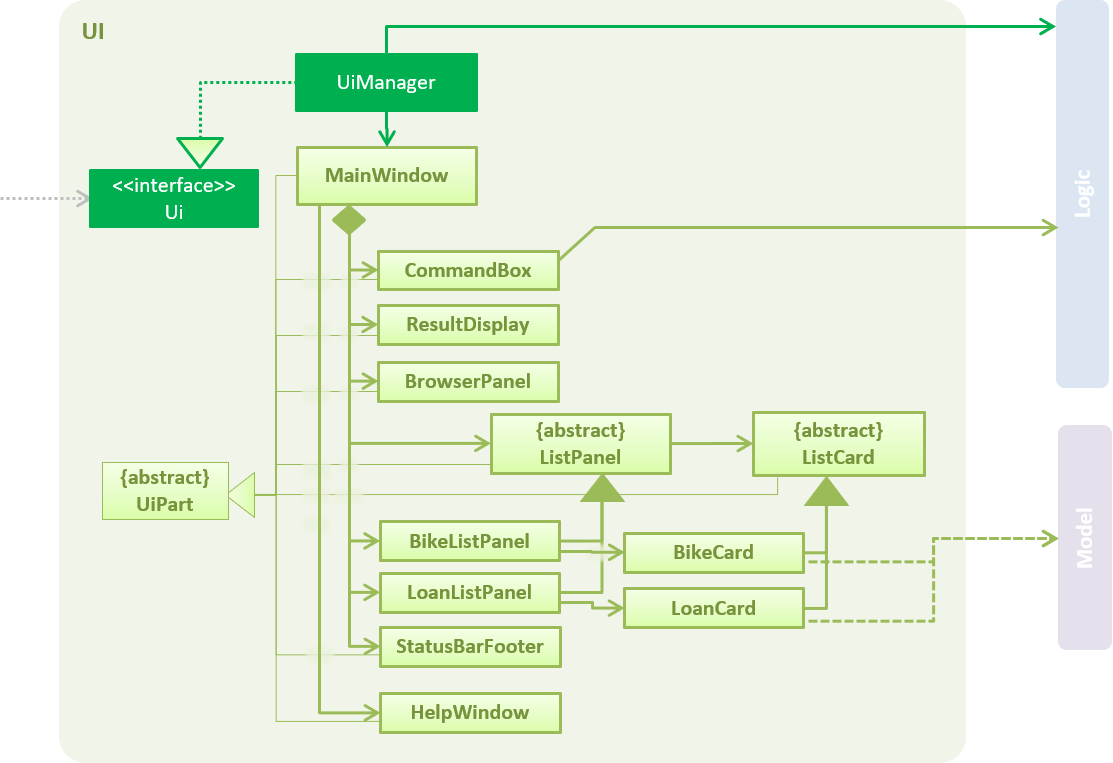
API : Ui.java
The UI consists of a MainWindow that is made up of parts e.g.CommandBox, ResultDisplay, LoanListPanel, StatusBarFooter, BrowserPanel etc. All these, including the MainWindow, inherit from the abstract UiPart class.
The UI component uses JavaFx UI framework. The layout of these UI parts are defined in matching .fxml files that are in the src/main/resources/view folder. For example, the layout of the MainWindow is specified in MainWindow.fxml
The UI component,
-
Executes user commands using the
Logiccomponent. -
Binds itself to some data in the
Modelso that the UI can auto-update when data in theModelchange. -
Responds to events raised from various parts of the App and updates the UI accordingly.
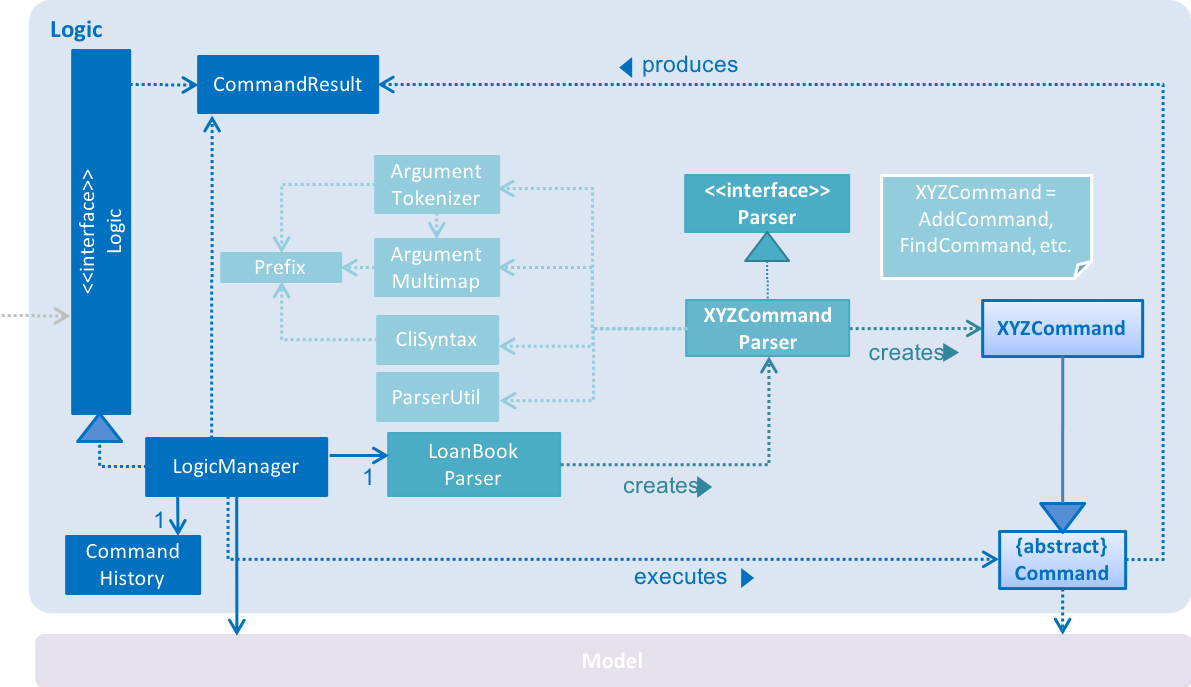
2.3. Logic component
API :
Logic.java
-
Logicuses theLoanBookParserclass to parse the user command. -
This results in a
Commandobject which is executed by theLogicManager. -
The command execution can affect the
Model(e.g. adding a loan) and/or raise events. -
The result of the command execution is encapsulated as a
CommandResultobject which is passed back to theUi.
Given below is the Sequence Diagram for interactions within the Logic component for the execute("delete i/1 x/a12345") API call.
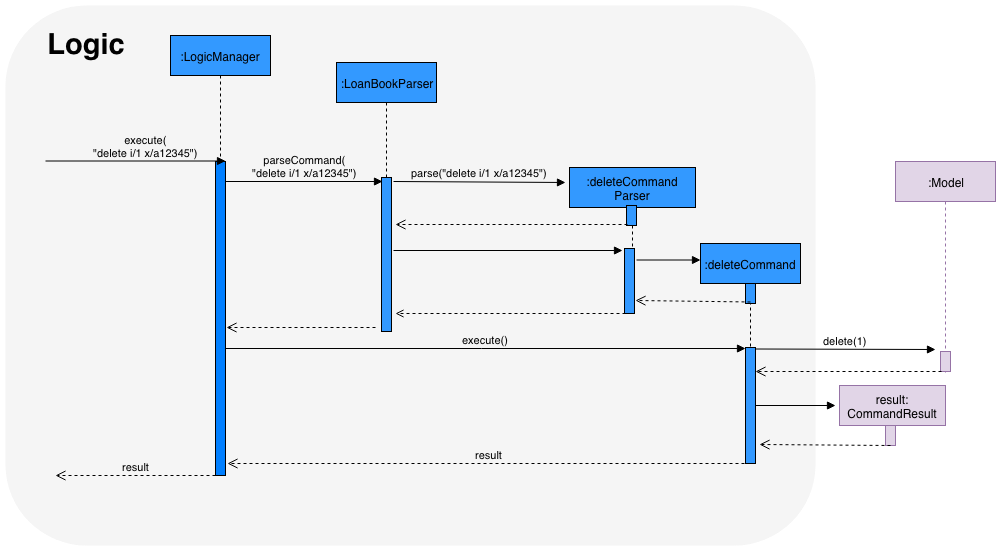
delete i/1 x/a12345 Command2.4. Model component
The model component:
-
Stores the LoanBook data.
-
Stores the user’s preferences.
-
Exposes an unmodifiable
ObservableList<Loan>that can be 'observed' by the UI, so that the UI automatically updates when the data in the model changes. -
Does not depend on any of the other three components.
It allows the following operations:
-
Viewing, adding, modifying and deleting
Bikes andLoans from the LoanBook. -
Retrieving lists of
Bikes andLoans that are registered in the LoanBook, filtered by aPredicate. -
Undo/redo operations.
The component’s class diagram is given below:
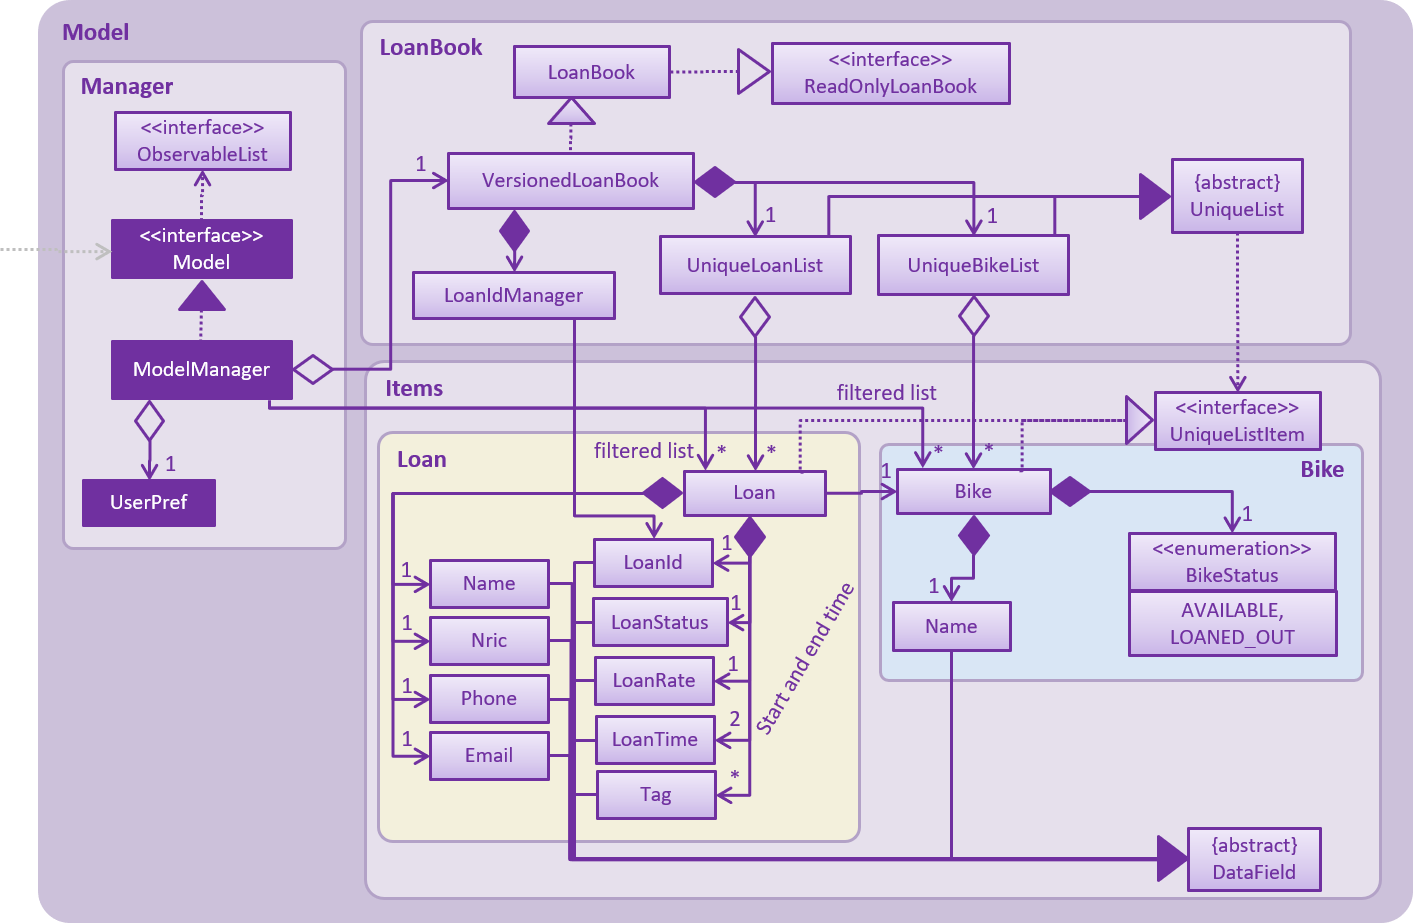
API file: Model.java
The API is backed by a ModelManager which contains:
-
A
VersionedLoanBookobject which tracks the main data (i.e.Bikes andLoans) within the LoanBook. -
A filtered list each for
Bikes andLoans to expose to the UI. -
A
UserPrefsobject to track the user’s preferences.
Most operations passed to the Model component deal with its VersionedLoanBook. A VersionedLoanBook is simply a regular LoanBook that keeps track of its own history, for the undo/redo operation. The LoanBook itself contains:
-
A
LoanIdManagerthat helps to assign a uniqueLoanIdto everyLoan, so thatLoans may be easily identified. -
A list of unique
Bikes. -
A list of unique
Loans.
|
A unique list in the sense above is a list where no two elements are the "same":
We want to exclude duplicate items from these lists to make sure that identifying any given To facilitate this structure, both the |
Most of the commands passed into the Model are forwarded to its LoanBook, which then executes these commands on the Bike and Loan lists that it has.
A Loan contains:
-
The customer’s particulars: Their
Name,Nric,PhoneandEmail. -
The
Bikethat the customer is renting. -
A
LoanStatusused to signal whether thisLoanisOngoing,ReturnedorDeleted. -
A
LoanIdused for identifying thisLoan. -
A
LoanRatespecifying the rate which the bicycle is being loaned at, in $/hr. -
A
loanStartTimeandloanEndTime, specifying the scheduled start and end times of the loan.loanEndTimemight benullif the loan has no scheduled return time. -
Any number of
Tags to provide additional details for theLoan.
A Bike contains:
-
A
Nameused for identifying thisBike. -
A
BikeStatusreflecting the current status of thisBike, e.g. whether it’s available for rental, loaned out, under repair etc.
Currently, the BikeStatus field within the Bike class is present but not being used for anything. A future use of this field is proposed in the section on Bicycle Management.
|
The DataField class is used to unify the common idea that the above details for Loan s and Bike s are specifiable by a user-inputted string. The only exception is the Bike field in the Loan class, which is specified using the Bike 's Name instead.
|
2.5. Storage component
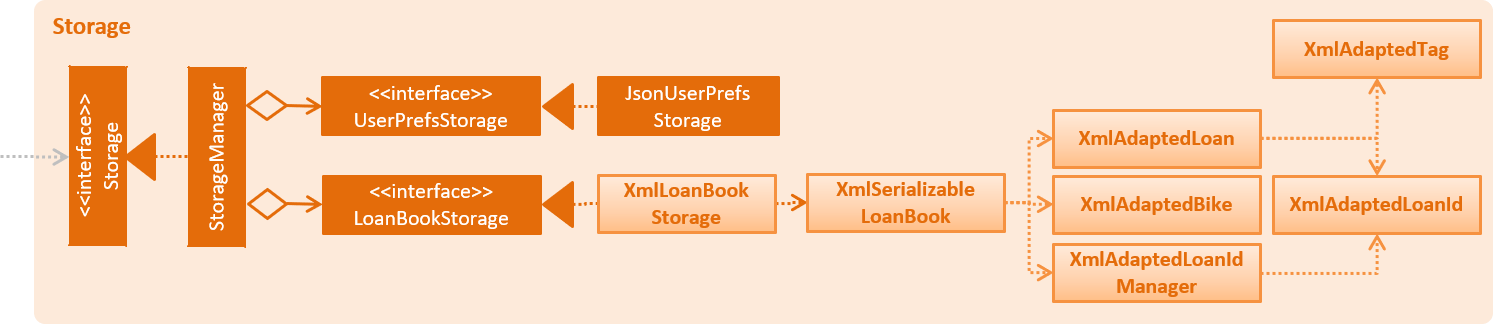
API : Storage.java
The Storage component,
-
can save
UserPrefobjects in json format and read it back. -
can save the Loan Book data in xml format and read it back.
2.6. Common classes
Classes used by multiple components are in the loanbook.commons package.
3. Implementation
This section describes some noteworthy details on how certain features are implemented.
3.1. Undo/Redo feature
3.1.1. Current Implementation
The undo/redo mechanism is facilitated by VersionedLoanBook.
It extends LoanBook with an undo/redo history, stored internally as a loanBookStateList and currentStatePointer.
Additionally, it implements the following operations:
-
VersionedLoanBook#commit()— Saves the current loan book state in its history. -
VersionedLoanBook#undo()— Restores the previous loan book state from its history. -
VersionedLoanBook#redo()— Restores a previously undone loan book state from its history.
These operations are exposed in the Model interface as Model#commitLoanBook(), Model#undoLoanBook() and Model#redoLoanBook() respectively.
Given below is an example usage scenario and how the undo/redo mechanism behaves at each step.
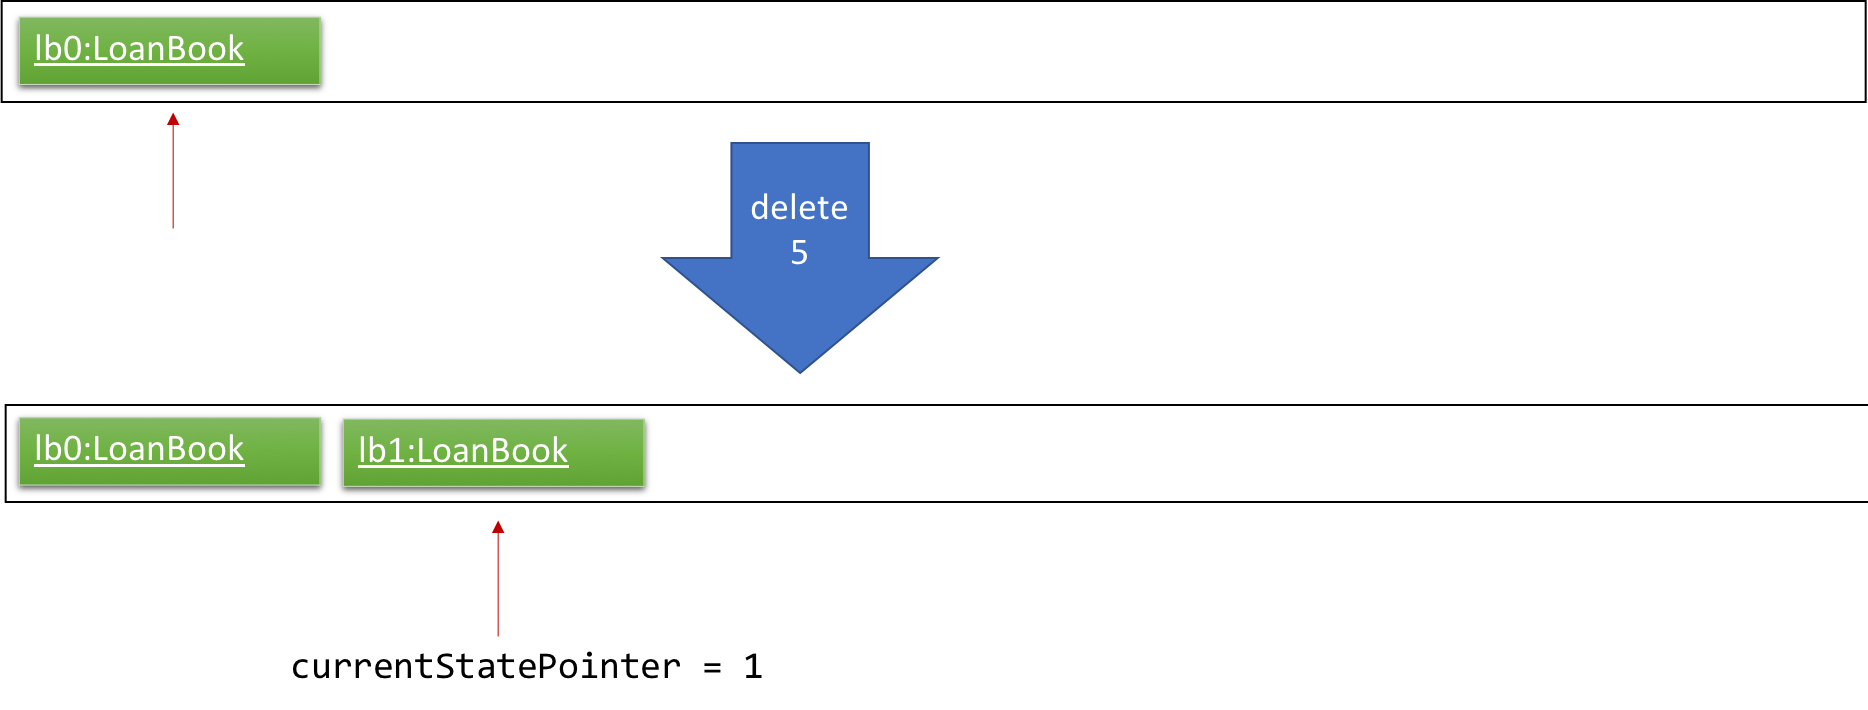
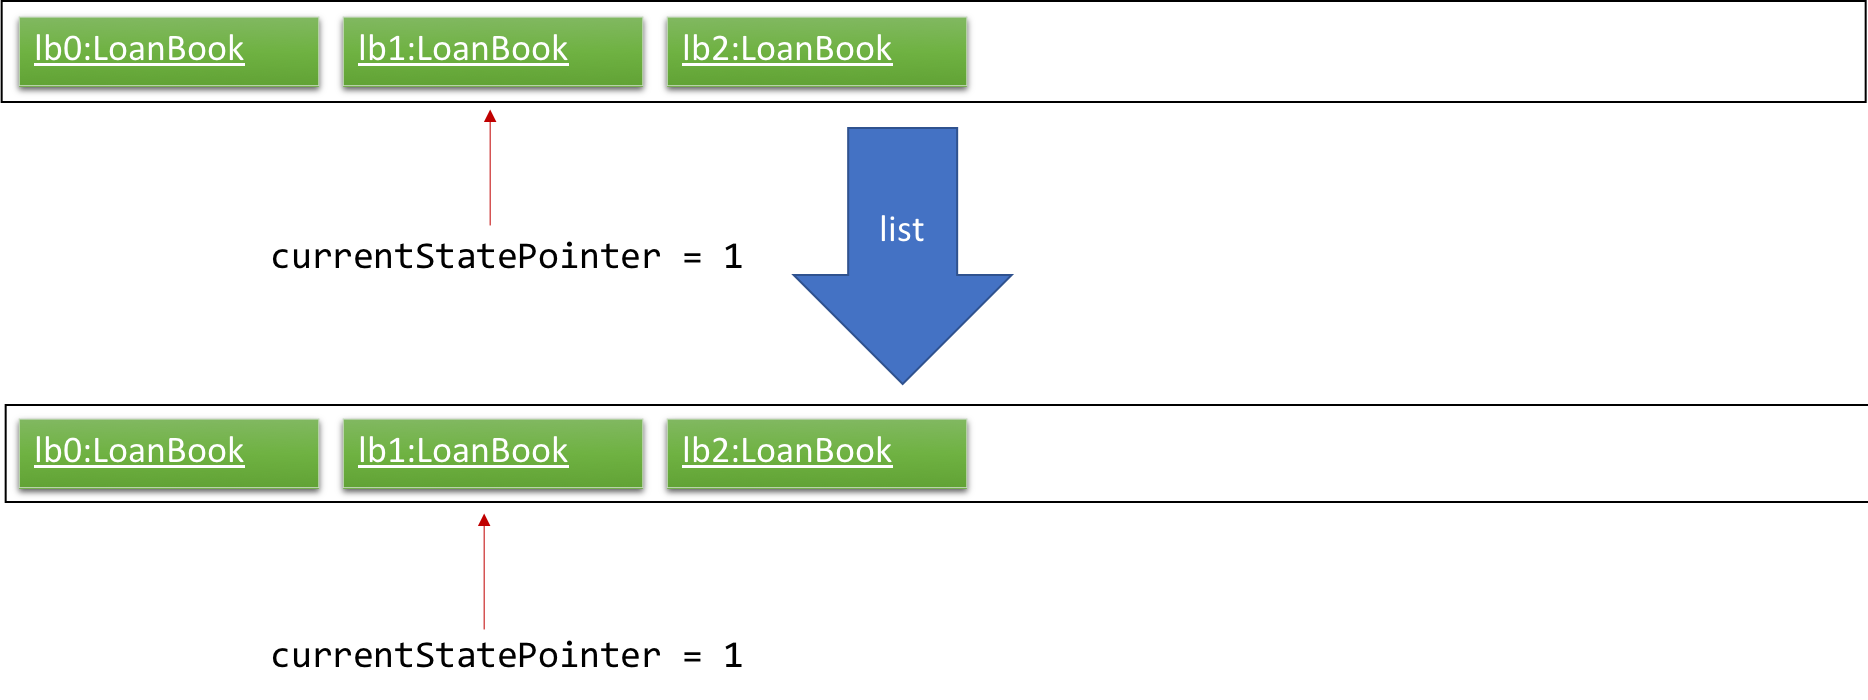
Step 1. The user launches the application for the first time. The VersionedLoanBook will be initialized with the initial loan book state, and the currentStatePointer pointing to that single loan book state.

Step 2. The user executes delete 5 command to delete the 5th loan in the loan book. The delete command calls Model#commitLoanBook(), causing the modified state of the loan book after the delete 5 command executes to be saved in the loanBookStateList, and the currentStatePointer is shifted to the newly inserted loan book state.
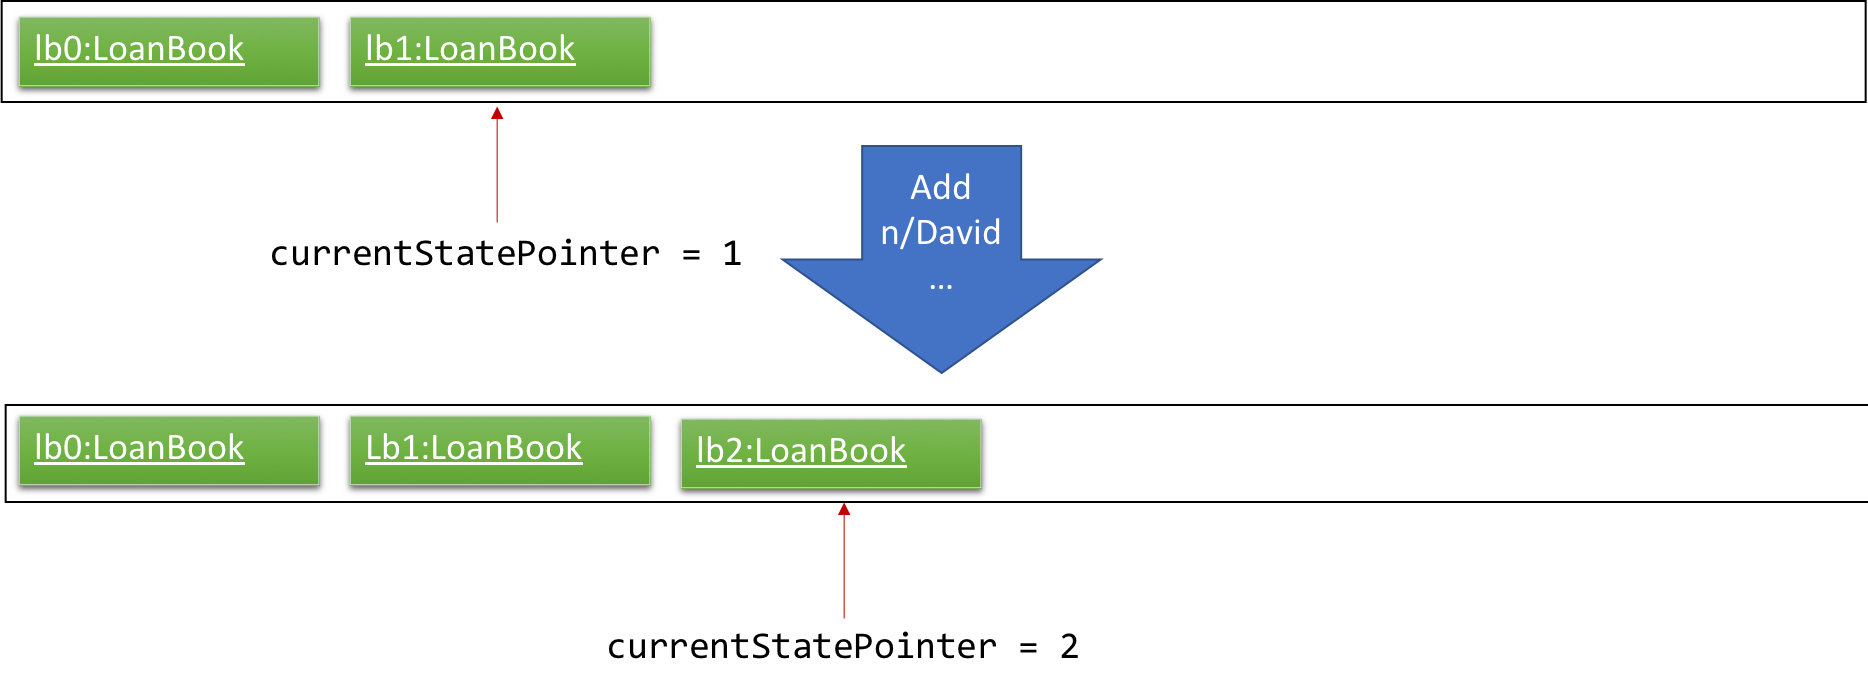
Step 3. The user executes add n/David … to add a new loan. The add command also calls Model#commitLoanBook(), causing another modified loan book state to be saved into the loanBookStateList.
If a command fails its execution, it will not call Model#commitLoanBook(), so the loan book state will not be saved into the loanBookStateList.
|
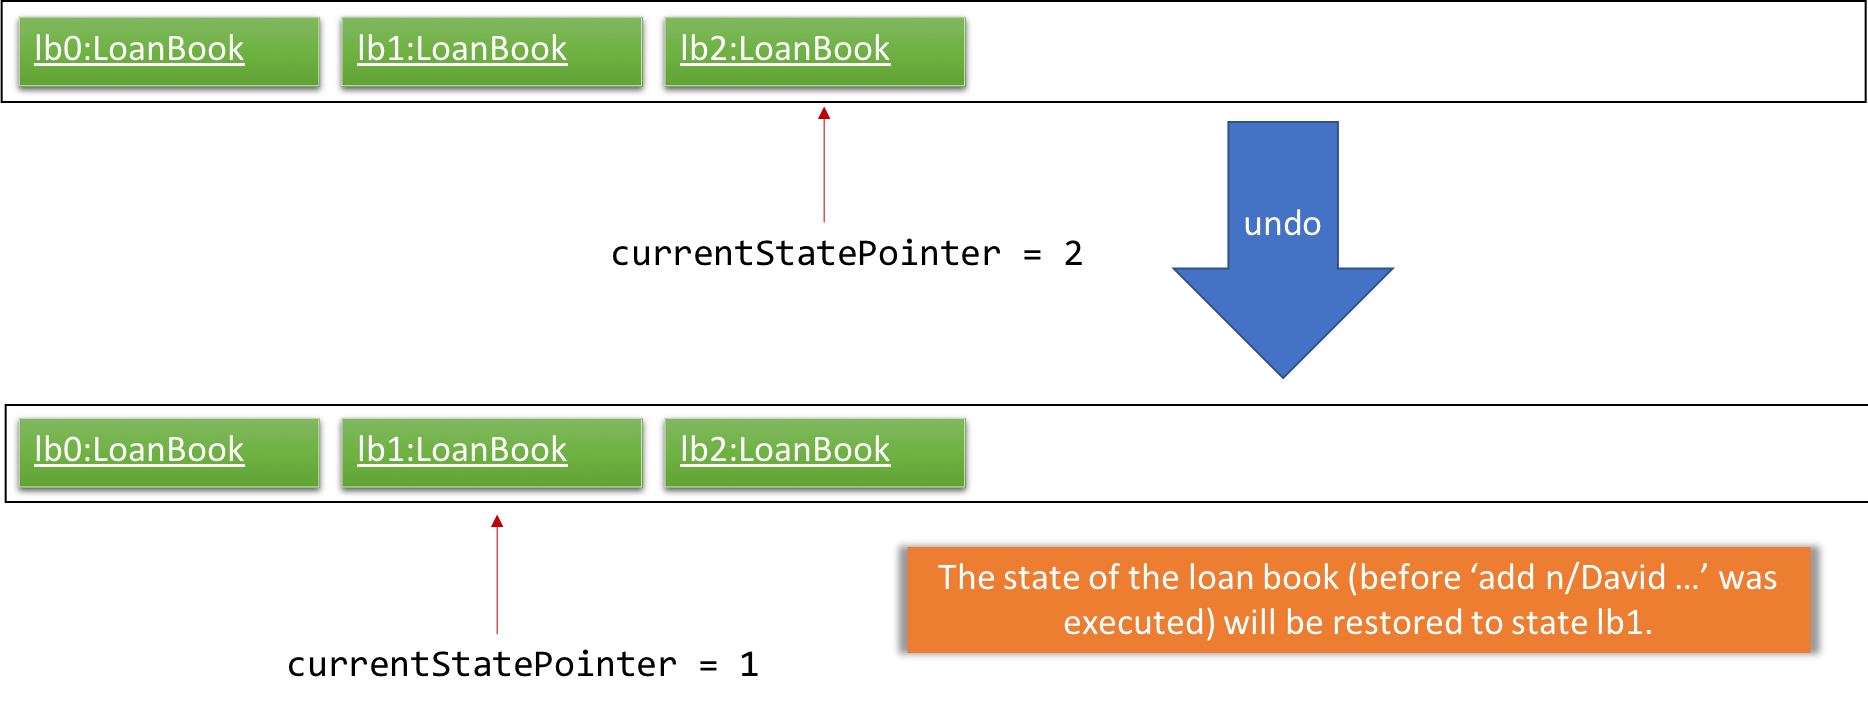
Step 4. The user now decides that adding the loan was a mistake, and decides to undo that action by executing the undo command. The undo command will call Model#undoLoanBook(), which will shift the currentStatePointer once to the left, pointing it to the previous loan book state, and restores the loan book to that state.
If the currentStatePointer is at index 0, pointing to the initial loan book state, then there are no previous loan book states to restore. The undo command uses Model#canUndoLoanBook() to check if this is the case. If so, it will return an error to the user rather than attempting to perform the undo.
|
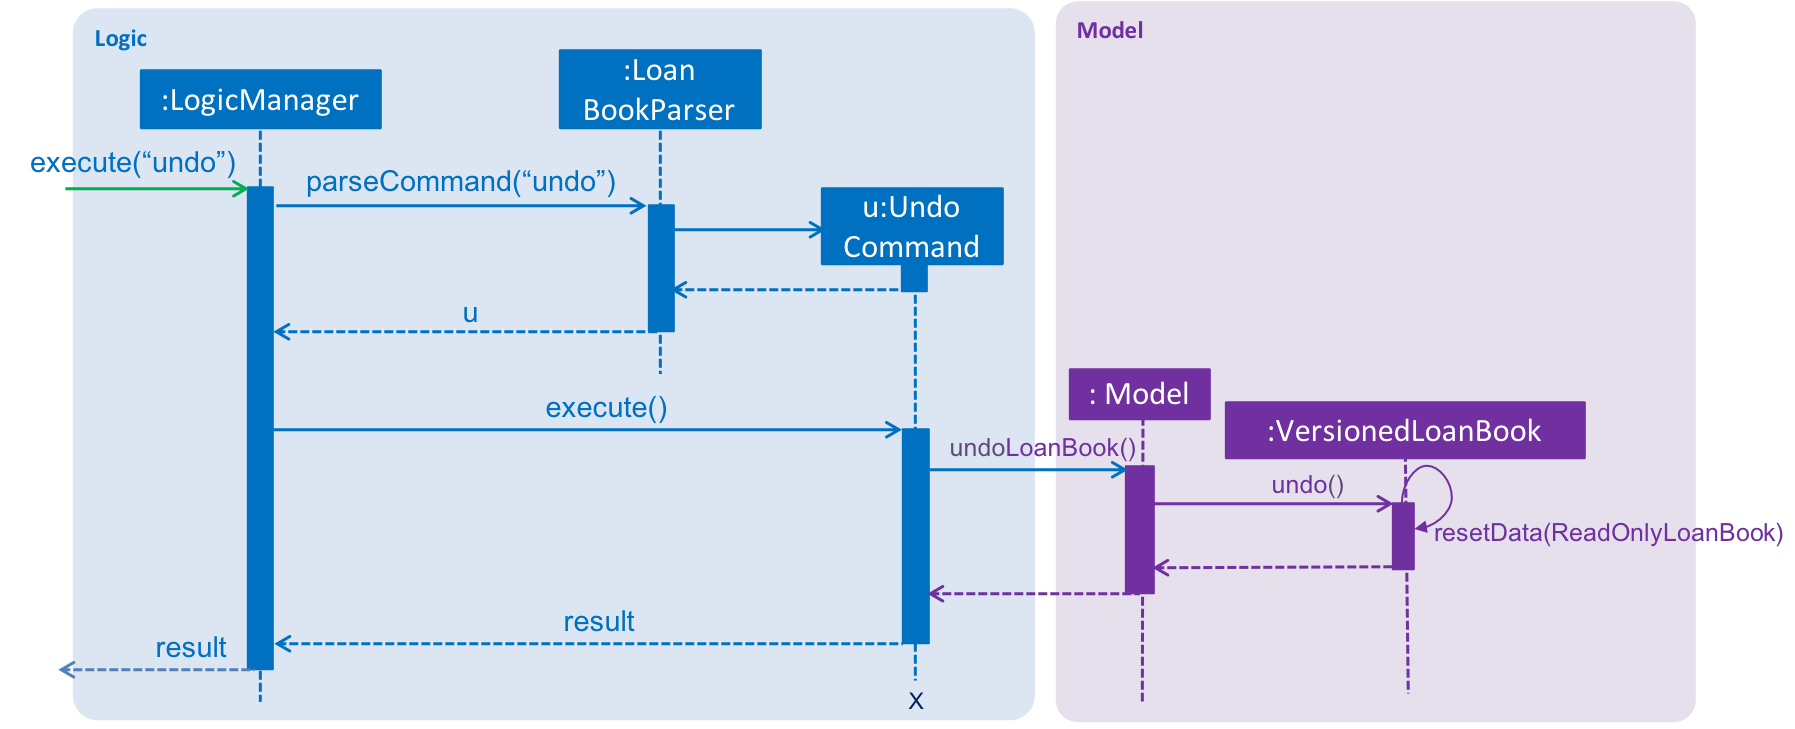
The following sequence diagram shows how the undo operation works:
The redo command does the opposite — it calls Model#redoLoanBook(), which shifts the currentStatePointer once to the right, pointing to the previously undone state, and restores the loan book to that state.
If the currentStatePointer is at index loanBookStateList.size() - 1, pointing to the latest loan book state, then there are no undone loan book states to restore. The redo command uses Model#canRedoLoanBook() to check if this is the case. If so, it will return an error to the user rather than attempting to perform the redo.
|
Step 5. The user then decides to execute the command list. Commands that do not modify the loan book, such as list, will usually not call Model#commitLoanBook(), Model#undoLoanBook() or Model#redoLoanBook(). Thus, the loanBookStateList remains unchanged.
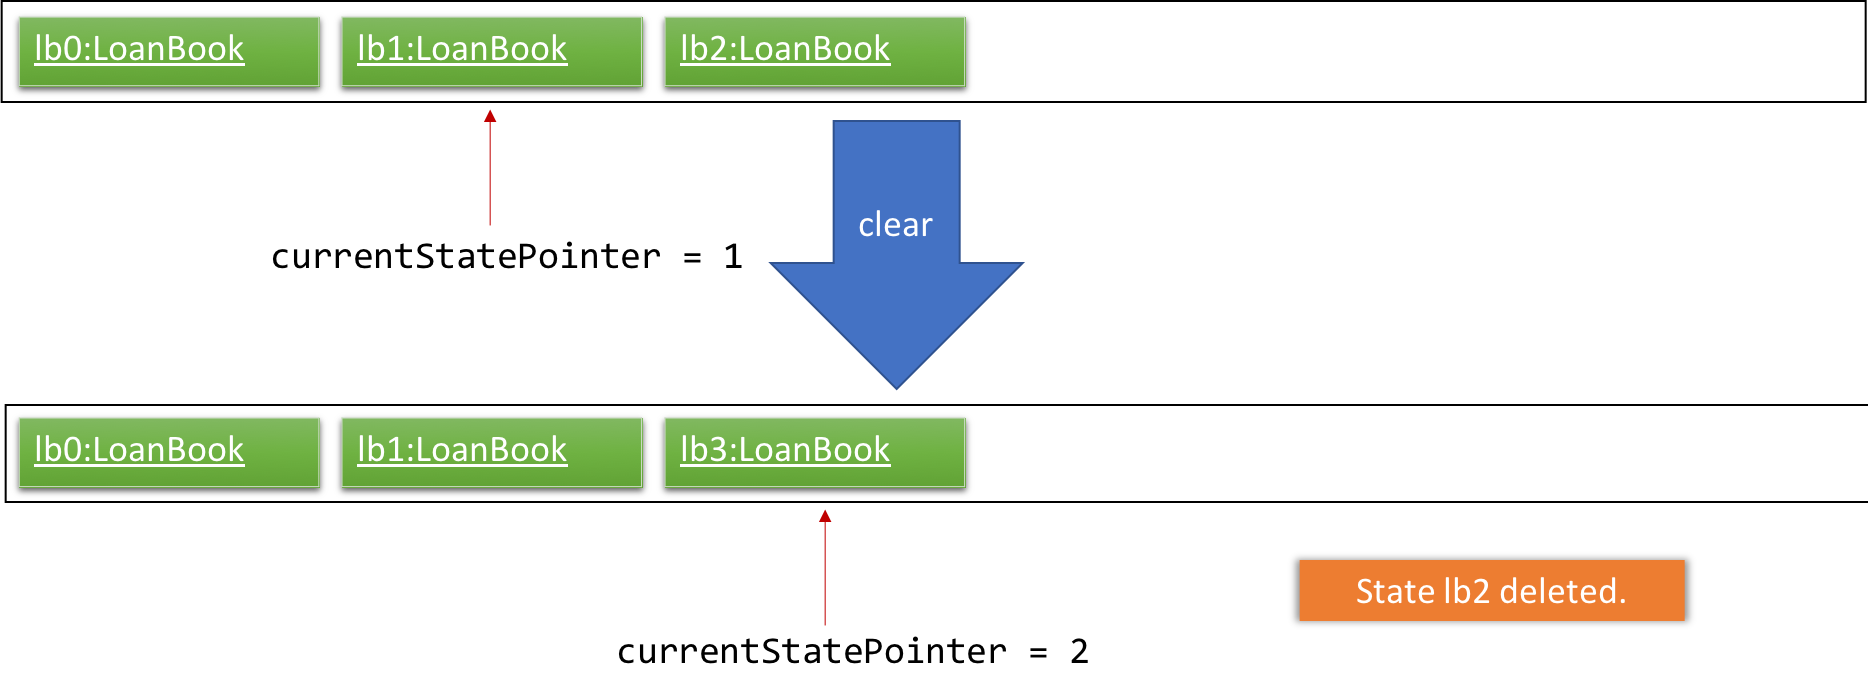
Step 6. The user executes clear, which calls Model#commitLoanBook(). Since the currentStatePointer is not pointing at the end of the loanBookStateList, all loan book states after the currentStatePointer will be purged. We designed it this way because it no longer makes sense to redo the add n/David … command. This is the behavior that most modern desktop applications follow.
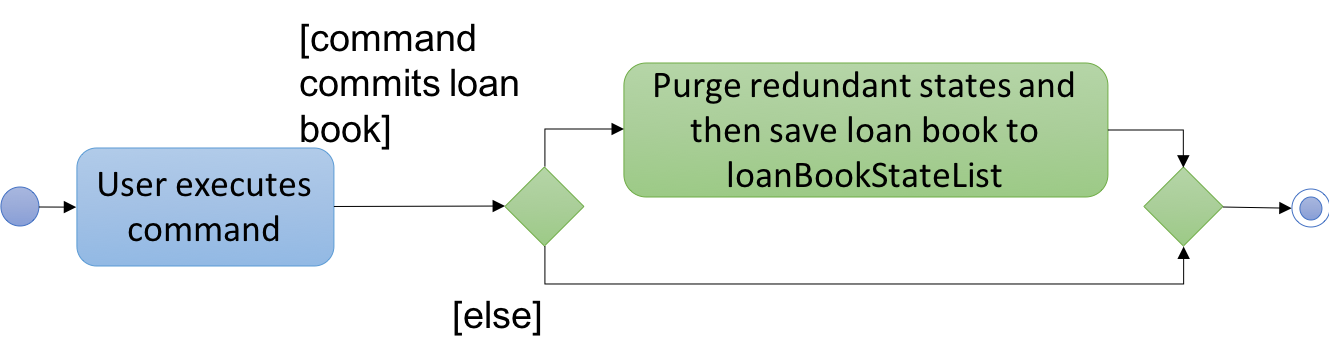
The following activity diagram summarizes what happens when a user executes a new command:
3.1.2. Design Considerations
Aspect: How undo & redo executes
-
Alternative 1 (current choice): Saves the entire loan book.
-
Pros: Easy to implement.
-
Cons: May have performance issues in terms of memory usage.
-
-
Alternative 2: Individual command knows how to undo/redo by itself.
-
Pros: Will use less memory (e.g. for
delete, just save the loan being deleted). -
Cons: We must ensure that the implementation of each individual command are correct.
-
Aspect: Data structure to support the undo/redo commands
-
Alternative 1 (current choice): Use a list to store the history of loan book states.
-
Pros: Easy for new Computer Science student undergraduates to understand, who are likely to be the new incoming developers of our project.
-
Cons: Logic is duplicated twice. For example, when a new command is executed, we must remember to update both
HistoryManagerandVersionedLoanBook.
-
-
Alternative 2: Use
HistoryManagerfor undo/redo-
Pros: We do not need to maintain a separate list, and just reuse what is already in the codebase.
-
Cons: Requires dealing with commands that have already been undone: We must remember to skip these commands. Violates Single Responsibility Principle and Separation of Concerns as
HistoryManagernow needs to do two different things.
-
3.2. Unique Loan ID
To keep individual loan transactions identifiable, we have a Loan ID for every loan. This will be automatically assigned when the user creates a Loan using the add command, and will be unique among all Loans in the Loanbook.
3.2.1. Current Implementation
In the current implementation, the Loan IDs are represented using integers. The added loans will be assigned IDs in increasing order starting from 0 (i.e. the first loan will be assigned ID 0, the second loan will be assigned ID 1, the third loan, ID 2, and so on).
Since this value will be a represented by a Java int, the maximum possible ID has been set to be 999,999,999 to prevent any integer overflow. The user will not be allowed to add a Loan using the add command after that maximum ID has been assigned.
|
The running ID mechanism is facilitated by the LoanIdManager class, which is a component within the LoanBook class. After initialization using the last used Loan ID value, it stores a running integer value which increments whenever the next Loan ID is generated using getNextAvailableLoanId().
Since the LoanIdManager is a component within the LoanBook class, this makes it possible to capture the internal state of the LoanIdManager at any point for future use. It allows for simple integration with the existing undo/redo mechanism, and can be stored within the same XML file that contains all other Loanbook details.
The following steps are taken when the user adds a new Loan using the add command:
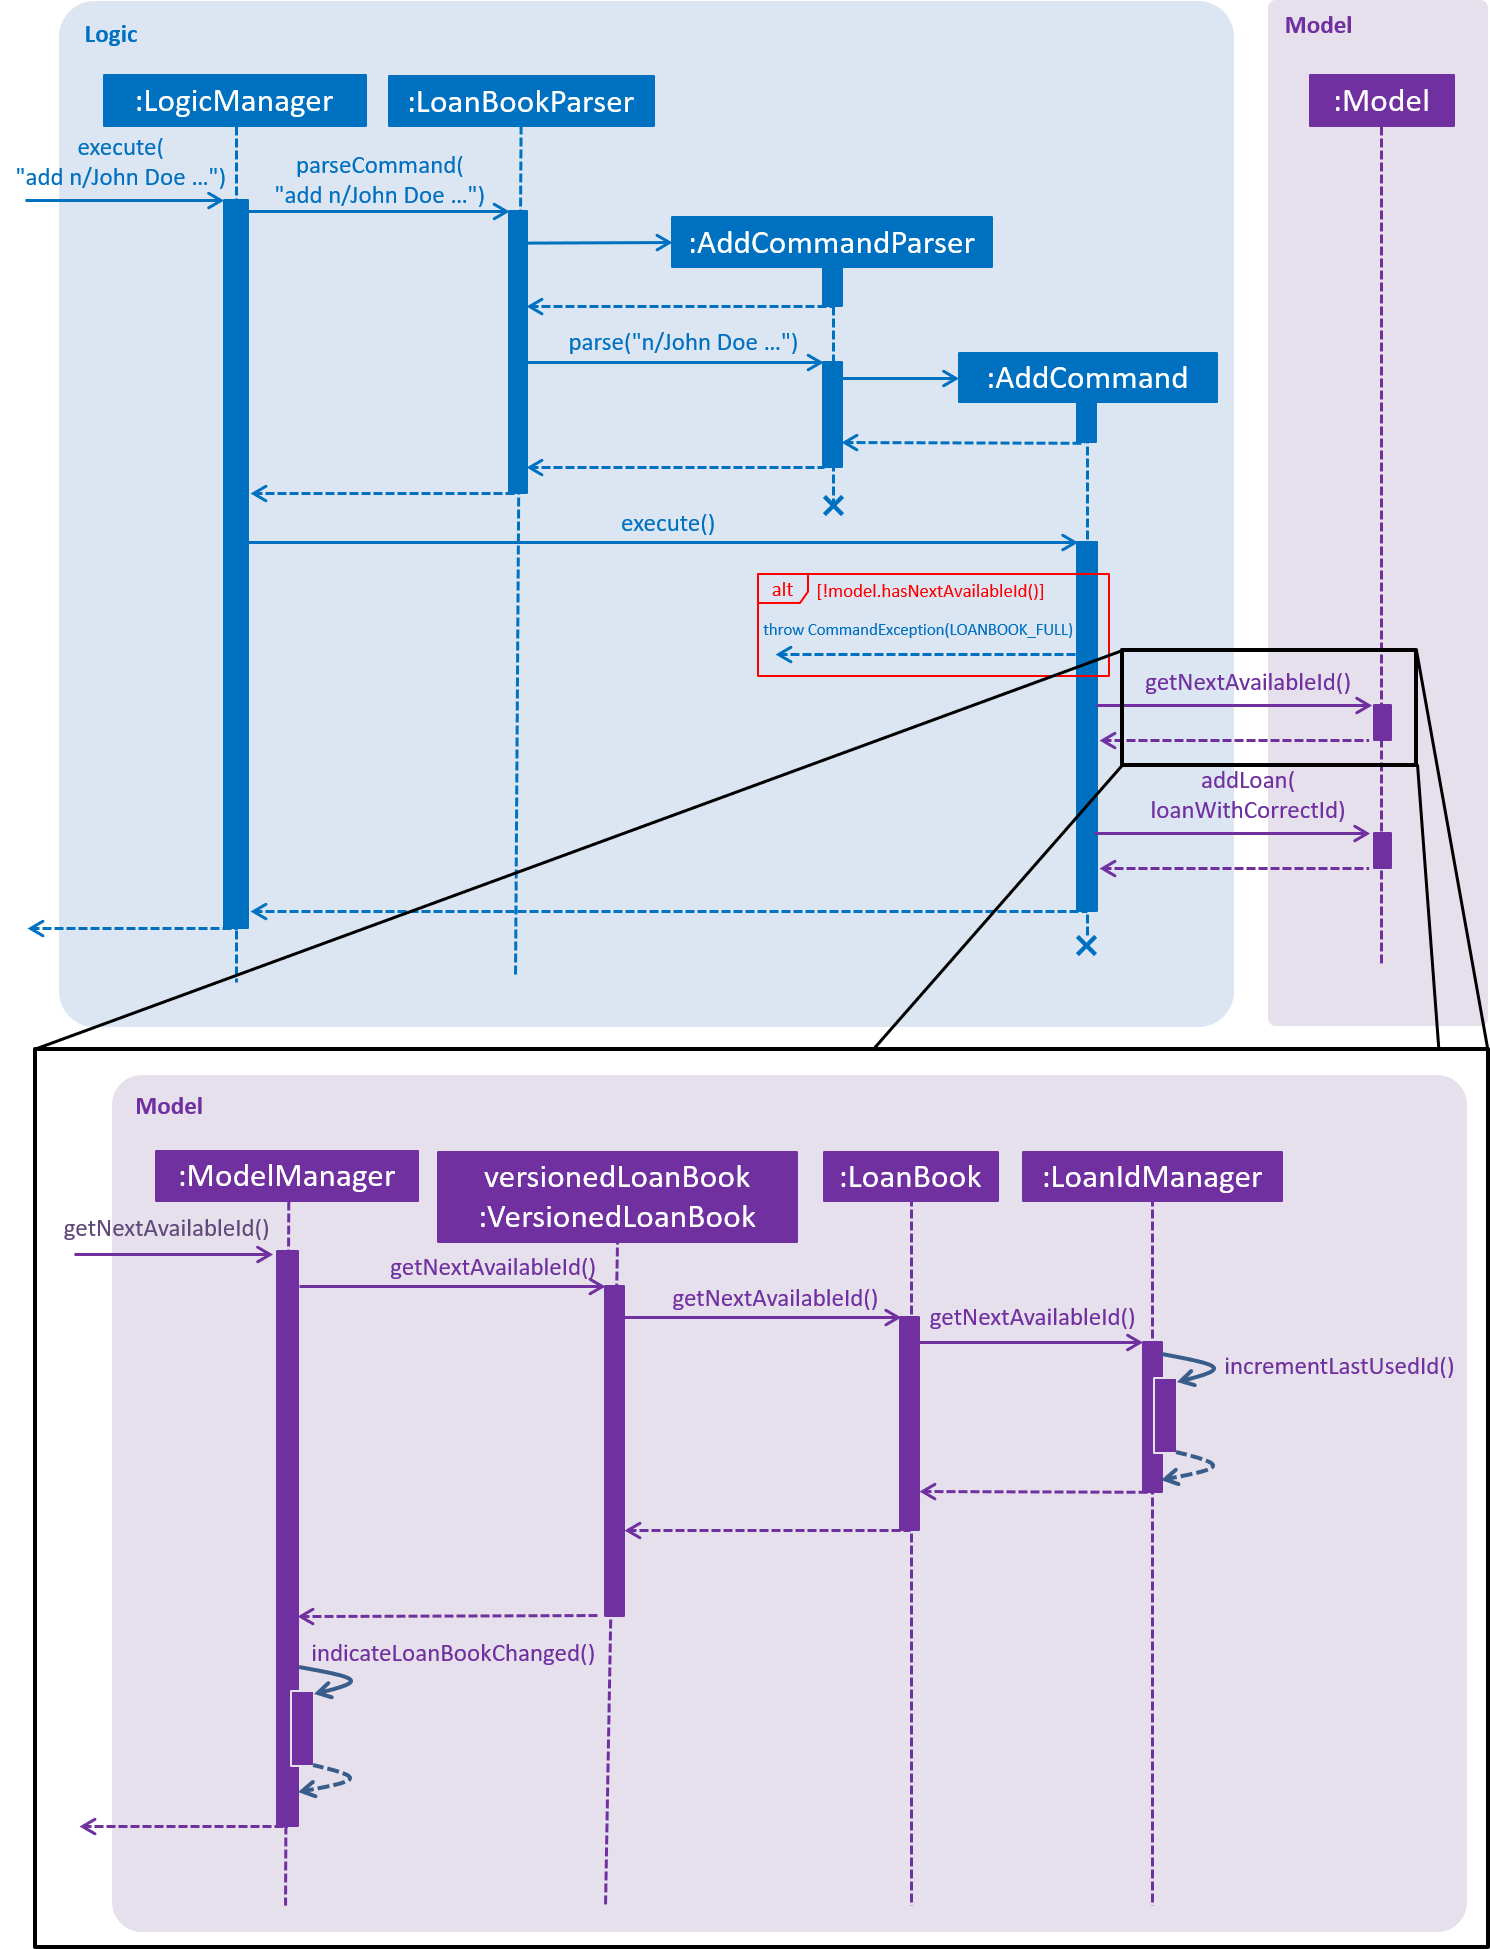
Step 1: After typing an add command, the AddCommandParser will parse the user input and construct a new Loan instance with a placeholder Loan ID, which is then used to construct a new AddCommand instance.
Step 2: When AddCommand gets executed, the next available Loan ID will be generated via the Model interface. This will increment the internal running ID within the LoanIdManager of the VersionedLoanBook.
Step 3: A new Loan instance will be generated using the generated Loan ID value. This new Loan instance gets inserted into the VersionedLoanBook and gets committed.
The following sequence diagram shows how the add command functions, including the retrieval of the next Loan ID from the Model:
3.2.2. Design Considerations
Aspect: Using an Integer for the Loan ID
-
Alternative: Use a
Stringto represent the Loan ID-
Pros: More Loan ID values can be created given the same number of characters.
-
There would be no technical limit to the number of Loan IDs possible. If all Loan IDs of a certain length get exhausted, the next generated Loan ID can be one character longer.
-
-
Cons:
-
Generating the next available Loan ID may be more complicated for a string as compared to an integer (though not by a significant amount).
-
-
Possible Implementation: A running counter, starting from 0, that resets at the start of every day. The Loan ID is formed by taking the current date, in "YYYYMMDD" format, and appending it with said running counter.
-
Pros: Simple to implement.
-
Cons: Depending on the end-user, the fact that the Loan ID displays the number of loans created during that day may be undesirable.
-
-
Possible implementation: Generate a string with a fixed number of characters.
-
Pros: The ID does not allow the number of loans created to be determined. This may be useful if this behaviour is desirable by the end-user.
-
Cons:
-
The model needs to keep track of all the IDs that have been used before to prevent duplicates.
-
The ID may be troublesome to type in the command-line, especially if the Loan ID is used for other commands.
-
-
-
Aspect: Having a LoanIdManager class simply to keep track of a running counter
-
Alternative: Have a static integer variable in the
Loanor theVersionedLoanBookclass-
Pros:
-
The process of incrementing the running value is simpler and has lesser steps than with a
LoanIdManagerclass.
-
-
Cons:
-
It is more complicated to capture the state of the running value. The undo/redo mechanism may not work with a static variable.
-
-
3.3. Authentication
Before critical actions such as deleting a loan can be performed, authentication of user is required. This ensures that only authorized users are able to perform critical actions. This is done by requiring a password before performing a critical action.
3.3.1. Current Implementation
The following provide a walkthrough on how the authentication feature is implemented. |
The authentication mechanism is provided by the Password class. It implements the following operations that facilitates authentications:
-
Password#isSamePassword(currentPass, providedPass)— Checks if bothprovidedPassandcurrentPassare the same password after decryption. -
Password#generateSalt()— Generate a hashing salt for the app. -
Password#encrypt(providedPass, salt)— EncryptprovidedPassusing hashingsalt.
Given below is an example usage scenario and how the authentication mechanism behaves at each step:
Step 1. The user launches the application for the first time. UserPref will be initialised with a randomly generated salt by calling Password#generateSalt(), and a default hashed password from a12345.
Example of a hashing salt is:
R9hE4pccZYI3BYfQa6etrVD5n7sLRK8G9S8KJRLUqTvdJH15oYnsR1EyrYL2FGH1xDVulTrPEYt1ByVPoVmS4uDDzKzPjZJg2i9SPvOdOMtap6xfBVZLld7ZnEqgdMuhknvLzYilwKy8yHzaEsjk0PEhR5G1XaEMd2dqw6fAhng4ML5UzvIMo2s8HmB4NU7G5pk5yyiQYvam5XrLm0k24ZLUV7zbmmhKXACYlFKcEMMI9LzQcMwBXgN5KHe08H3UStep 2. The user executes setpass a12345 newP4sS command to change the password to newP4sS.
Step 3. Input password will be checked against the app’s password using Password#isSamePassword() to ensure that the user has sufficient elevation to change the password of the app.
Step 4 Password class will encrypt the new password using Password#encrypt(), and call Model#setPass() to changes the password of the application in UserPref.
Example of an encrypted password:
d46XwZ4pClMXcItYHiNPJ4gHc8IKRFt8QnVDJd8axQ0=
If the current password input is wrong or if the current password is the same as the new password input, it will not call Model#setPass(), so the UserPref state will not be saved.
|
Step 5. Password in UserPref is saved to the encrypted value of the new password input.
The following sequence diagram shows how the setpass operation works:
The following activity diagram summarizes what happens when a user executes setpass:
Step 6. The user executes a critical command delete i/1 x/a12345.
Step 7. This command runs Model#getPass() to retrieve the current password. It then call Password#isSamePassword() to determine if the input password in the command is the same as the existing password.
Step 8. Deletion of loan at index 1 will occur.
| If current password input is wrong, or if the index provided is invalid, deletion will not occur. |
The following sequence diagram shows how the new delete operation works:
The following activity diagram summarizes what happens when a user executes delete:
3.3.2. Design Considerations
The following aspects are considerations that our team had made before the implementation of this feature. |
Aspect: How to authenticate users
To ensure that only authorised users can execute elevated commands, we had to consider different alternatives on how to authenticate the user.
-
Alternative 1 (current choice): Require a password every time a critical command is executed
-
Pros:
-
Ensures that each command authenticates the user before executing
-
Easy to implement
-
-
Cons:
-
Might be inconvenient to perform multiple critical commands as repeated typing of password is required.
-
-
-
Alternative 2: A login page to authenticate users
-
Pros:
-
Customized to each staff
-
Provides accountability of each command execution as we can now track which staff ran which commands
-
Scalable for a large company.
-
-
Cons:
-
Difficult to implement
-
Not effective for our target audience as bicycle shop owners are often family-owned business, which does not have a large manpower.
-
If a staff did not log out, non-authorized users will be able to execute critical commands, making the app’s data vulnerable.
-
-
Aspect: Method of encryption
To ensure that the app’s password is properly encrypted, we had to consider between storing the password locally, and storing the password online.
-
Alternative 1 (current choice): Generate a salt to encrypt password, and store the salt locally
-
Pros:
-
Does not require the internet, ensuring that any hack attempts to the app has to be done physically.
-
Much less complicated to implement as compared to alternatives solutions.
-
-
Cons:
-
Encrypted password and salt can be accessed in
preference.json.
-
-
-
Alternative 2: Send a POST request to an online server to authenticate each login request
-
Pros:
-
If done properly, ensures that hashed password cannot be intercepted/retrieved by hackers.
-
-
Cons:
-
Requires the internet, which might not be available to bicycle shop owners as parks are not fibre-optic ready.
-
Difficult to implement.
-
Data can be intercepted and manipulated during POST request, as opposed to a local storage of password.
-
-
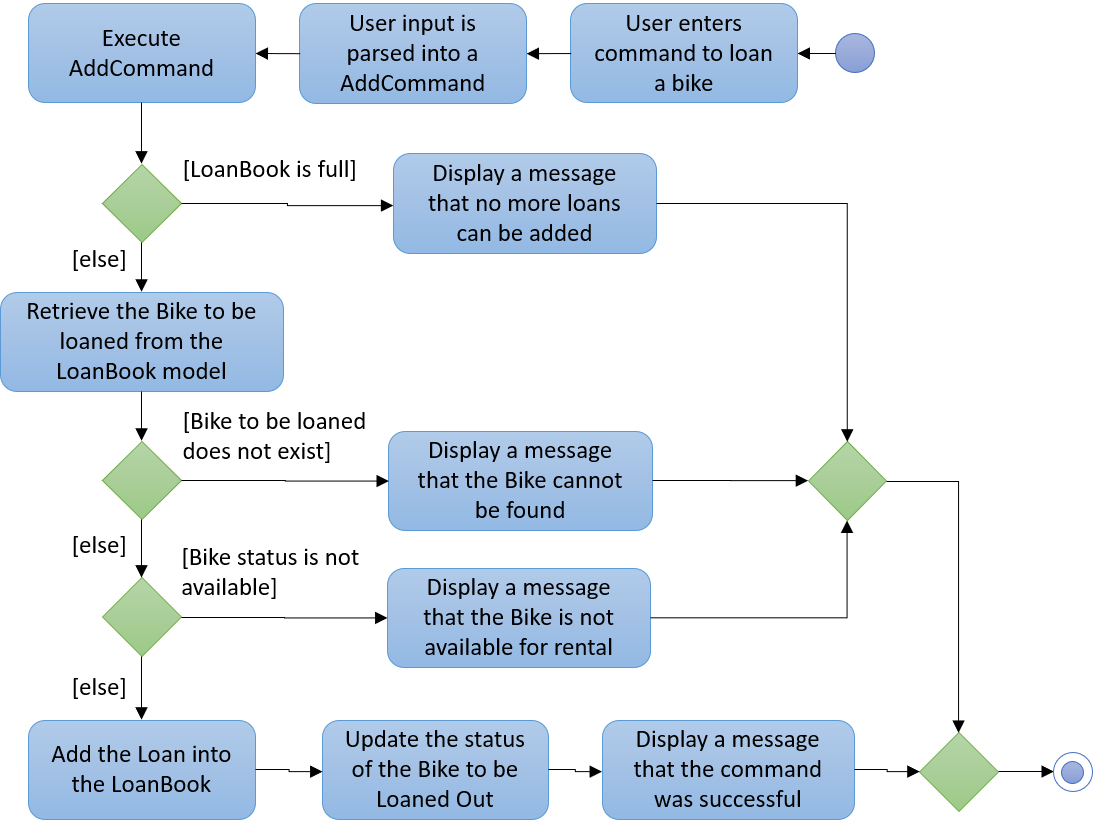
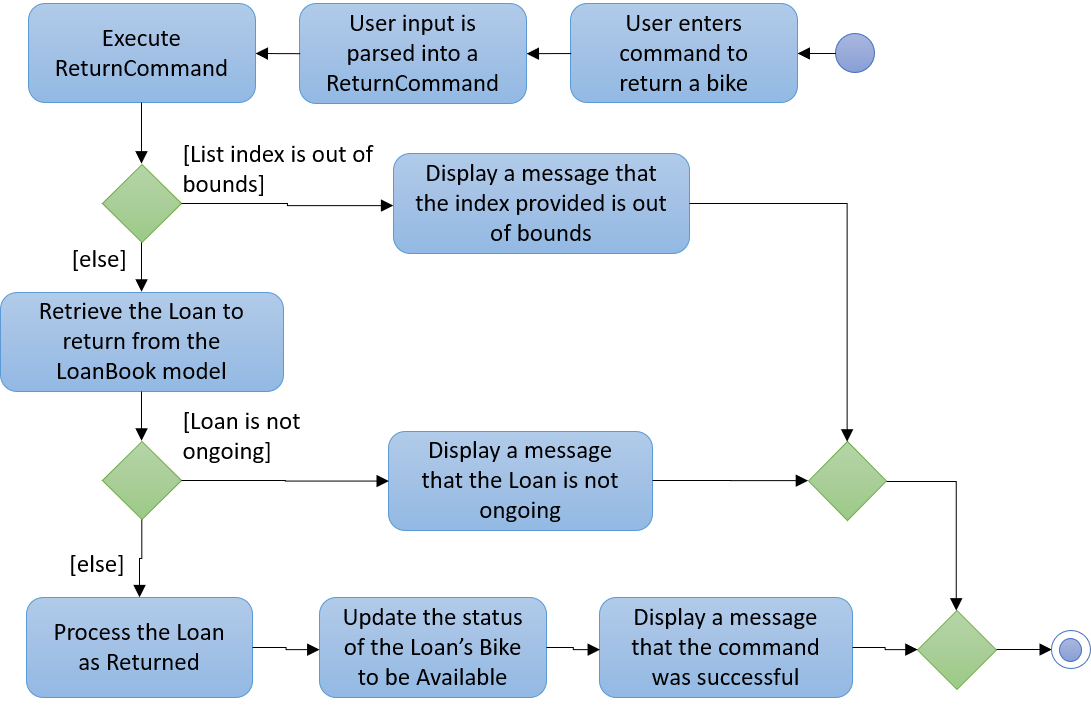
3.4. Return a Loan feature
A LoanBook application that only allows users to do loans without being able to return them would not serve its purpose. When you take out a loan, it should automatically come with the feature of being returnable. This is the functionality for that.
3.4.1. Current Implementation
The source code for this implementation can be found in ReturnCommand.java.
Returning a loan is done by setting the corresponding status of the loan to LoanStatus.RETURNED. Other than setting the enum to be returned, the cost of the loan will also be calculated and displayed to the user.
The steps that have to be done by LoanBook is as follows.
-
Check the start and end time of the loan to ensure that the loan period is valid.
-
Store the current time as the return time of the loan.
-
Change the enum of
LoanStatusto becomeLoanStatus.RETURNED. -
Calculate the cost of the loan and display it in the GUI as a suggestion for the user.
This is summarized in the following Activity Diagram:
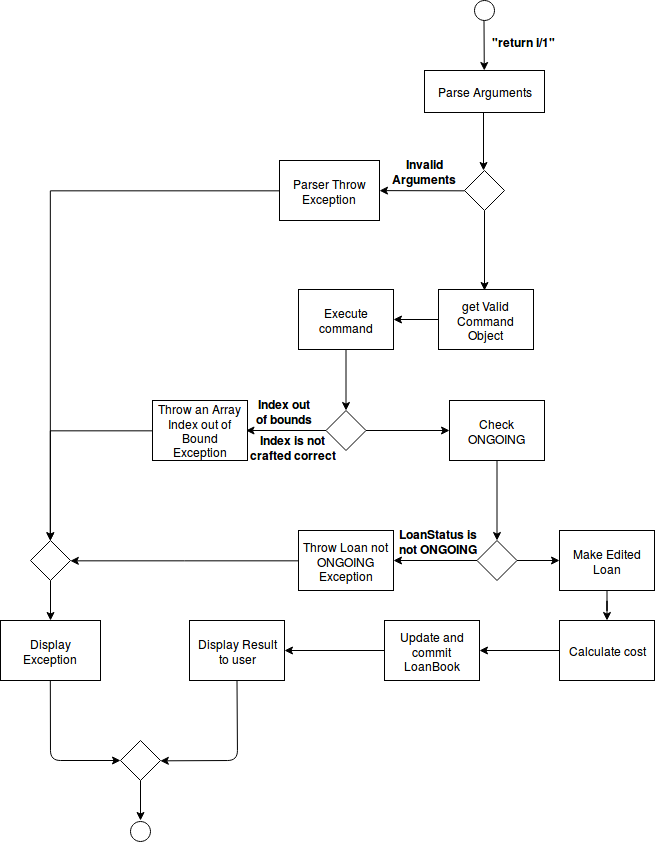
These steps would change the given Loan object, and update the properties of the Loan object. The appropriate values stored within the Loan object would therefore change accordingly.
Given below is an example usage scenerio and how the internals of the Loan would behave:
Step 1. The user would have to do a search for which loan they would like to return. This will pull up a list of loans from which the user would be able to select the correct loan.
Step 2. Using the current system time as the endTime, the duration of the loan will be calculated. Should the duration ever be negative, an error message will be thrown. This is because such a scenario would not ever be possible in the LoanBook.
Step 3. The user decides to return the current loan (in the case of the above image, the user wants to return loan at index 3, as selected). User will therefore key in return i/3.
The LoanBook will save the current time into the LoanTime endTime field. This would be done by calling the constructor LoanTime(). Also, the loanStatus field would also be updated from ONGOING to RETURNED.
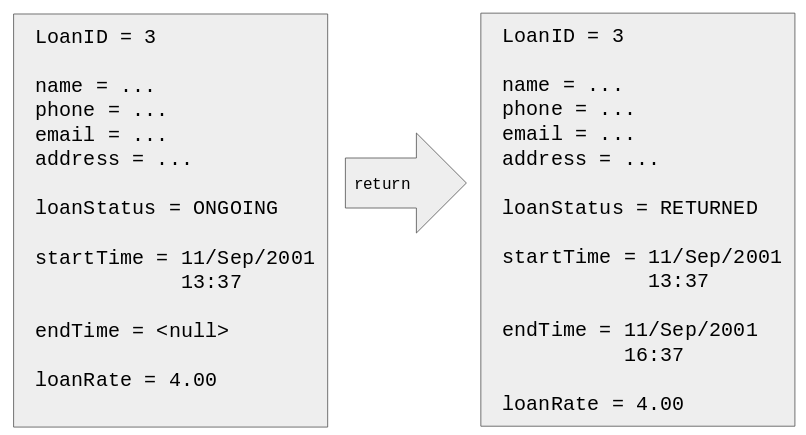
Note that originally the loan has a null value for end time. Note that the endTime and loanStatus values has been updated.
| If the loan has already been returned or deleted, a corresponding error message will notify you that you cannot return a loan that is not ongoing. This check happens during this step. |
Step 4. The function now calculates the cost of the loan. This price would be based on the amount of time the loan was active for, as well as the loanRate that was set, by multiplying the time with the rate.
| Although the time saved is to the millisecond, the time that is multiplied when we are getting the cost is rounded down to the nearest minute. In a sense, this is "pro-rating" the cost, and making it more discrete. |
The result is then displayed into the GUI for the user as the cost price of the loan.
| It is possible for the LoanBook to have a loan that lasts for 0 minutes. This is because there may be some weird edge case where an object is loaned for less than a minute, which gets prorated down. |
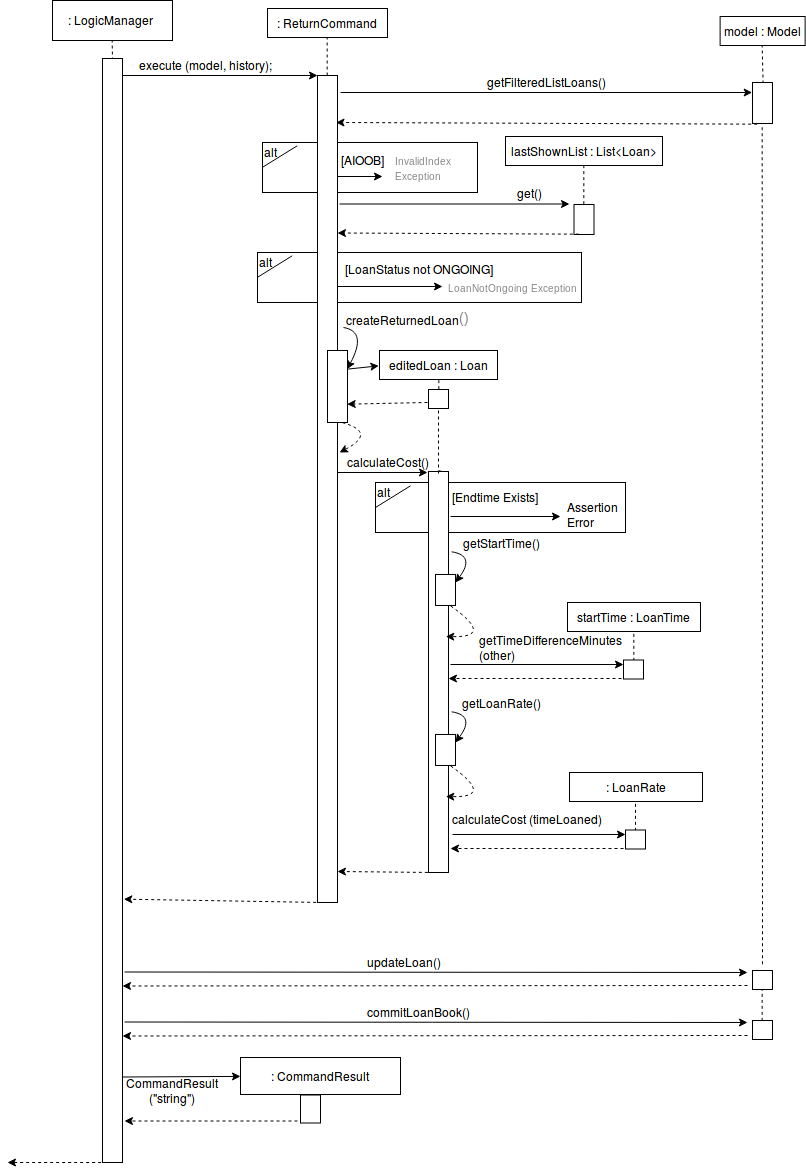
3.4.2. Sequence diagram
The sequence diagram has been split into 2 parts.
First, the sequence diagram of command parsing:
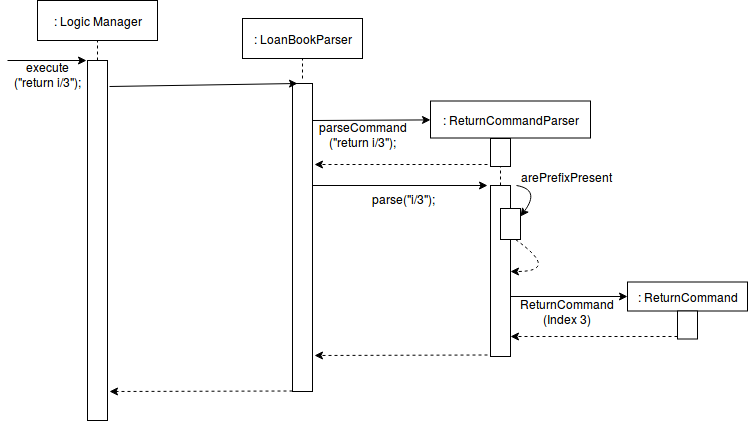
Second, the sequence diagram of command execution:
3.4.3. Design considerations:
Aspect: Using an enum vs changing the location of the loan
-
Alternative 1 (current choice): To create an enum that will store the status of the linked list.
-
Pros: Easy to implement the return a loan feature, and do not need to create new data storage features.
-
Cons: When using the
summaryfunction, it will take a longer amount of time, as the LoanBook would have to do a check at every step to ensure the correct data is appended to the correct place.
-
-
Alternative 2: Create new ArrayLists of
Loansfor each possible status of theLoanobjects.-
Pros: Computing the
summaryof the LoanBook would be much easier, and quicker. -
Cons:
returnfunctionality would run much slower, as there will be empty slots in the ArrayList after shifting the Loan objects around. Searching for loans would also be much more difficult, as the results from the various Loan ArrayLists has to be appended together.
-
3.5. Summary Feature
In order to allow the user to use the LoanBook effectively as an auditing tool, they must be able to get a summary of all the loans that they have made. This summary should ideally give them an idea of the statistics of each of their transactions at a glance.
3.5.1. Current Implementation
The source code for this implementation can be found in SummaryCommand.java.
Getting the summary of all the loans is simply done by looping through all the stored loans before and aggregating the statistics of all the loans.
Currently, the summary command displays to the user the following statistics:
-
Total number of ongoing loans
-
Total number of loans ever taken out
-
Total revenue from the loan service
This would give a very handy summary page as well as a printable audit page for the bicycle shop owners.
Given below is an example usage scenario and how the internals of the LoanBook behaves:
Step 1. The user simply has to type the summary keyword into the CLI.
Step 2. The LoanBook proceeds to loop through all the loans and aggregate the statistics of the loans.
Step 3. The LoanBook updates the display with the aggregated statistics, and this can be screenshotted by the user as a summary page.
3.5.2. Design considerations:
Aspect: Getting the summary
-
Alternative 1 (current choice): Looping through the entire list of loans to get the summary of the content
-
Pros: Easy to implement, and do not need to create new data storage features.
-
Cons: Looping through all loans will take more time, as the LoanBook would have to check every loan and recalculate.
-
-
Alternative 2: Use a cache to store previously calculated values of the summaries.
-
Pros: Quicker response time to the users.
-
Cons: Much harder to implement, cache might break if user edits past loans.
-
3.5.3. Future features
We plan to include a feature which allows users to summarize the LoanBook based on certain parameters. For example, in future implementations, the user will be able to filter the statistics based on the identity of a bicycle.
These are the proposed features you would be able to search based on:
-
Bicycle
-
Time period
-
Person who took out the loan
As well, having to recalculate all the loans would be a bad idea when the LoanBook contains many loans. A proposed solution would be to cache the results of the main summary method, so that the LoanBook would only have to recalculate the numbers based on loans that have not been added to the final tally.
Another idea would be to display all the loans in a printable table, when the summary feature is called. Perhaps this would generate a pdf file which shows all the list of loans that the LoanBook is keeping track of. Users can then take use this as a more stringent auditing tool.
3.6. Logging
We are using java.util.logging package for logging. The LogsCenter class is used to manage the logging levels and logging destinations.
-
The logging level can be controlled using the
logLevelsetting in the configuration file (See Section 3.7, “Configuration”) -
The
Loggerfor a class can be obtained usingLogsCenter.getLogger(Class)which will log messages according to the specified logging level -
Currently log messages are output through:
Consoleand to a.logfile.
Logging Levels
-
SEVERE: Critical problem detected which may possibly cause the termination of the application -
WARNING: Can continue, but with caution -
INFO: Information showing the noteworthy actions by the App -
FINE: Details that is not usually noteworthy but may be useful in debugging e.g. print the actual list instead of just its size
3.7. Configuration
Certain properties of the application can be controlled (e.g App name, logging level) through the configuration file (default: config.json).
3.8. Bicycle Management
As bicycles potentially have a lot of properties, statuses and actions associated with them, they are represented in the code base as a dedicated Bike class.
Each LoanBook has its own list of Bike s, representing all the bicycles that a bicycle shop owner has at their disposal. Please refer to the class diagram under the Model section of this guide for a full view of how Bike s are handled within LoanBook.
Every bicycle has the following members:
-
name: A name that uniquely identifies the bicycle, e.g. the bicycle’s serial number. -
status: The bicycle’s current status that represents where it is or what it is doing, e.g.AVAILABLE,LOANED_OUT.
Bike s are uniquely identified by their name, playing the same role as the id field for Loan s.
This implementation of bicycles affects existing commands in the following ways:
-
When
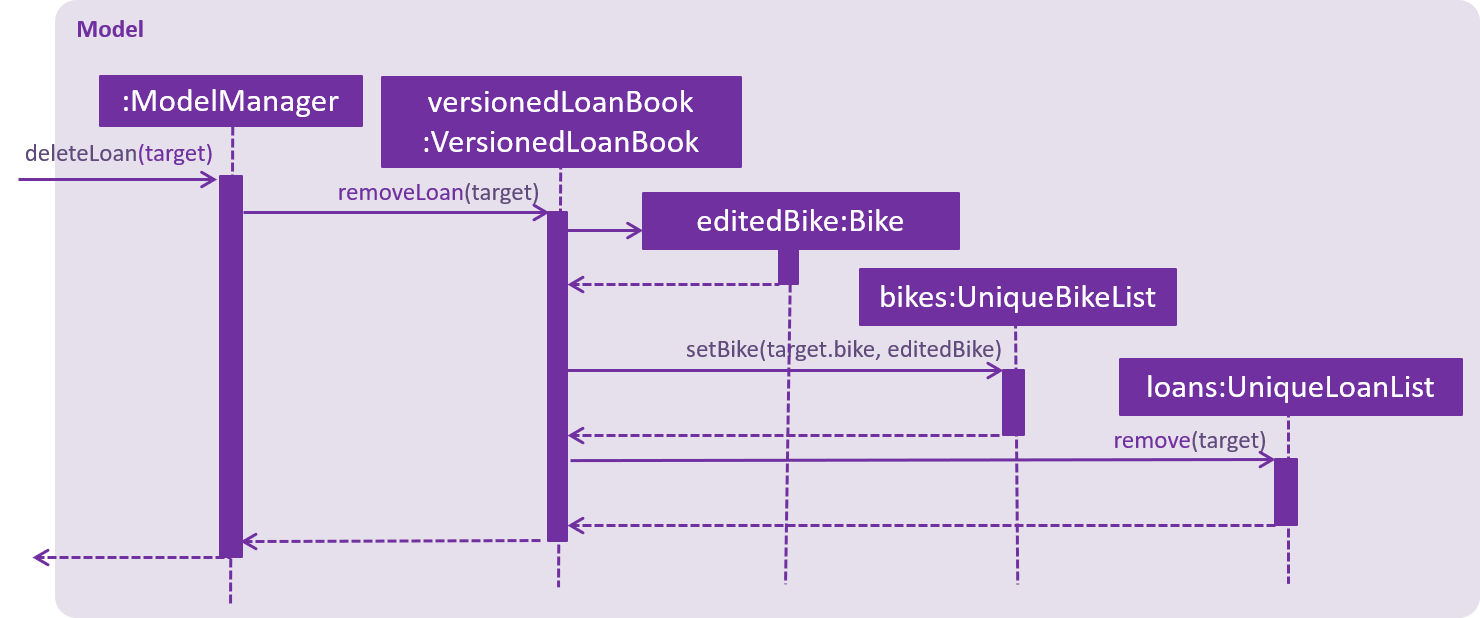
adding a newLoanto the LoanBook, LoanBook first checks if theBikename provided by the command refers to an existingBikewithin the LoanBook, and will reject the command if LoanBook does not. This check can only be done at the execution stage of the command (opposed to the parsing stage), as it requires specific knowledge of the model that it is acting on. A sequence diagram describing this behaviour in further detail is shown below:

-
Similarly, when editing a loan, LoanBook also checks that the new
Bikeassigned to the loan exists within the LoanBook before it accepts the operation.
The list of bicycles is maintained in largely the same way as the list of loans. The equivalent commands of add, edit, delete and list for maintaining the list of Bike s are addbike, editbike, deletebike and listbikes respectively.
Please refer to the User Guide for the basic functionality for these commands. The following subsections describe additional points to note for these commands, such as differences from the corresponding commands for loans.
3.8.1. Adding a bike: addbike
addbike checks if there is a Bike with the same name already in the LoanBook, and rejects the command if so.
On the other hand, add does not check for "duplicate loans" as loans are automatically differentiated via their LoanID, even if all other parameters are the same.
3.8.2. Editing a bike’s details: editbike
editbike similarly checks if the Bike to be edited exists within the LoanBook, and whether the Bike 's new name, if specified, is the same as another Bike in the LoanBook.
|
In the ideal scenario, when a
|
3.8.3. Deleting a bike: deletebike
Deleting Bike s from the LoanBook is currently quite unrestrictive: no constraints are imposed on the Bike that is being deleted.
This idea has not been implemented yet, but due to the dependency of Loan s on Bike s, it can be enforced that any bicycle that has been loaned out at least once should not be deleted from the system, merely archived and labelled Decommissioned instead. The Bike can still be deleted completely if all of the Loan s associated with it are deleted (i.e. invalidated) first.
|
3.8.4. Viewing the list of bikes in the UI: listbikes
The only purpose of the listbikes command is to toggle the UI to show the list of bikes. To return to viewing the list of loans, use the list command.
Internally, the MainWindow class of LoanBook keeps track of two separate UI elements: a BikeListPanel and a LoanListPanel, both inheriting from a ListPanel object. It also keeps track of which list is currently active (i.e. displayed to the user) by using a ListPanel pointer, so that only the ListPanel referred to by this pointer is displayed. When the MainWindow receives a signal (an event thrown by list or listbikes) to toggle which list is being displayed, it simply reassigns this pointer and rebuilds the display.
3.8.5. Future Considerations
Tracking the status of bikes
As mentioned in the Model section earlier in this guide, a BikeStatus is currently present in the Bike class but does not do anything.
This sub-feature aims to enhance the existing purpose of the Bicycle Management feature: keep better track of bicycles and prevent invalid transactions from being carried out.
One way which this sub-feature can accomplish this is by using a BikeStatus to indicate whether the Bike is available or not for rental.
The activity diagram below demonstrates how this sub-feature could be implemented for the loaning out of bicycles:
And this acitivty dragram demonstrates the same for returning bicycles:
Additionally, the deletion of a Bike can be denied if the Bike does not currently have a suitable status, such as being loaned out.
This sub-feature can be further expanded with additional BikeStatus es other than AVAILABLE and LOANED_OUT. Such statuses could reflect an unavailability for rental for reasons other than already being loaned out. For example:
-
NEEDS_REPAIR: Signals that theBikeis not suitable for rental as it is damaged, thus creating a hazard for customers. -
UNDER_REPAIR: Signals that theBikeis not available for rental as it is currently with a repairman undergoing servicing. -
ON_DISPLAY: Signals that theBikeis not suitable for rental as it is currently being used for display, to attract customers. -
MISSING: Signals that theBikeis not available for rental as its location is unaccounted for; perhaps the last customer lost it, or it was stolen during the night. -
DECOMMISSIONED: Signals that theBikeis no longer for rental for whatever reason (e.g. not economically feasible to repair), but remains in the LoanBook for administrative or archiving purposes.
Tracking the loans of a bike
Loan s already refer to Bike s, but Bike s can also track a list of references to the Loan s that loan them out. This could be especially useful for digging up the history of a particular Bike for investigative or analytical purposes.
This will make the LoanBook 's list of loans a little harder to manage, due to the extra references. To manage the deletion of loans, the loan will have to be dereferenced from the Bike it references before it gets deleted. The sequence diagram below demonstrates this process:
More bike properties
Additional fields can be added to the Bike class to track more properties specific to those Bike s. For example:
-
The bicycle’s brand, make and model.
-
The bicycle’s material and weight.
-
The bicycle’s length, height and wheel size.
-
The bicycle’s top speed and braking power.
-
How many gears the bicycle has, if at all.
These fields can then be filtered to find Bike s that could better suit a customer’s needs.
3.8.6. Design Considerations
Aspect: Internal representation of bicycles
-
Alternative 1 (current choice): Have a dedicated
Bikeclass.-
Pros: OO design. Easier to track status of bicycles. Bicycles can support more properties and features.
-
Cons: Complex internal representation. Additional memory used for tracking Bikes.
-
-
Alternative 2: Identify bikes by their names used in the Loans.
-
Pros: Simpler internal representation. Less data to manage internally or in storage.
-
Cons: Data on bikes have to be algorithmically searched for. Bicycles are assumed to exist and there is no verification for mistyped bicycle names. More difficult to implement bike-specific features.
-
3.9. Hide private information
Users must provide some important and personal information when adding a loan, e.g. Nric, so it is our responsibility to protect their privacy.
As a result, we have added a new feature to hide the private information from the Window.
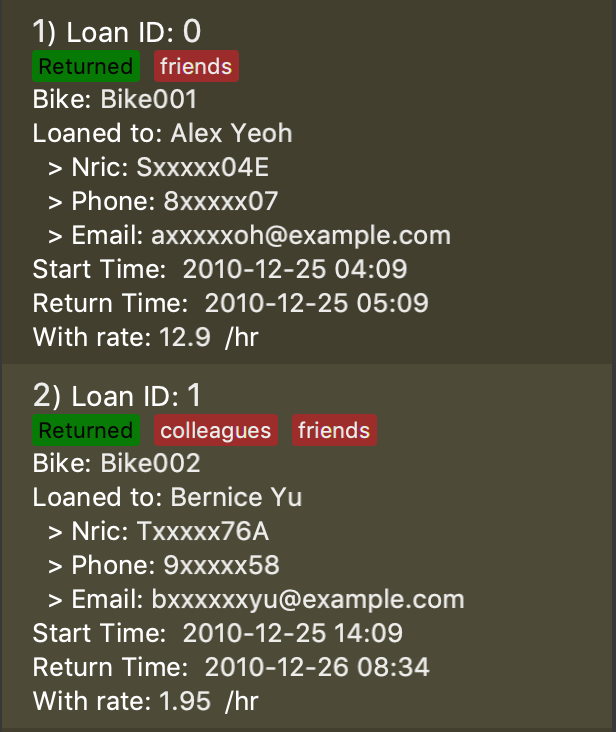
Example: The customer’s Nric as stored in the database is Nric: T0248272F, but our LoanCard will only show Nric: Txxxxx72F.
3.9.1. Current implementation
Hidden private information is facilitated by an interface called Censor. It is implemented by classes Nric, Phone and Email.
When showing a new loan, it will do the following operations:
-
LoanCard#LoanCard()— the constructor will assign values to each of the labels shown in the LoanCard. -
Nric#getCensored()— censor the Nric value and hide the first five digital numbers. Then it returns the censored String. -
Nric#doCensoring(int length)— Take in the length of the Nric String and return the censored part ("x" part) according to the length. -
Phone#getCensored()— censor the phone number and hide the first five digital numbers. Then it returns the censored String. -
Phone#doCensoring(int length)— Take in the length of the Phone String and return the censored part ("x" part) according to the length. -
Email#getCensored()— censor the email address and hide every characters except the last two characters in the local-part and the domain. -
Email#doCensoring(int length)— Take in the length of the Email String and return the censored part ("x" part) according to the length.
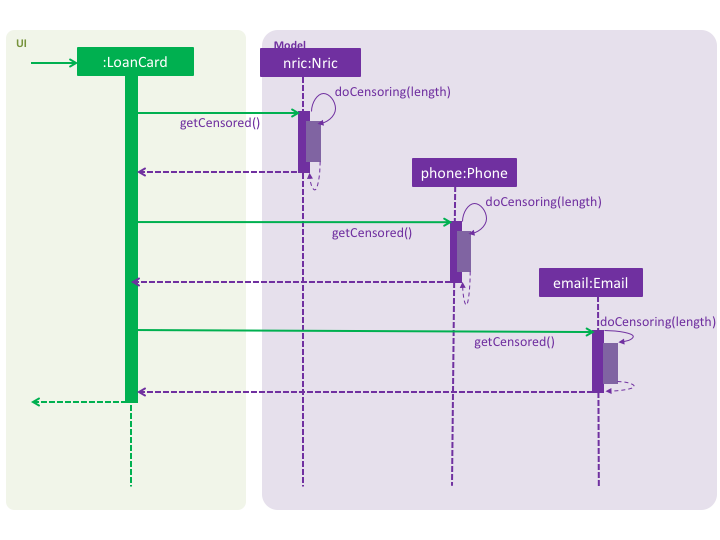
Given below is an example usage scenario and how this mechanism behaves at each step.
Step1. The user adds a new loan to the LoanBook. A new LoanCard object will be created.
The LoanCard object will contain information on the loan: LoanID, BikeID, Name, Nric, Phone, Email, LoanRate and LoanTime.
Step2. Assign the value of each of the components to their corresponding labels.
For example: name.setText(loan.getName().value); will directly assign the name String of this loan to the name label.
However, the values of Nric, Phone and Email need censoring before assigning their values, so they will call their own getCensored() method in their class.
getCensored() in each of these class will call their corresponding doCensoring(int) method. Then combine the censored part and remain part and return.
For example: phone.setText(loan.getPhone().getCensored().value); will censor the value of the phone String of this loan and then assign the censored value to the phone label.
The following sequence diagram shows how this operation works:
3.9.2. Design Considerations
Aspect: How to execute getCensored() and doCensoring(int)
-
Alternative 1 (current choice): each class implements from
Censorinterface.-
Pros: Easy to implement.
-
-
Alternative 2:
Loanclass implements fromCensorinterface.-
Cons: The method might be bulky.
-
3.10. Send Reminder Email feature
3.10.1. Current Implementation
The email sending mechanism is supported by the JavaMail library. This feature is composed of three commands: checkemail, setemail and remind.
-
checkemailcommand: display the email address that the user has set to send emails from. The app will censor the email address.If user has not set an email, the email address will be an invalid email and the app show a "You have not set your email yet!" message. -
setemailcommand: set the email address used for sending reminders to the customers.Only gmail is accepted by the app. -
remindcommand: automatically generate an email containing some core information about the loan, and send it to the corresponding customer from user’s email. This command will use theJavaMaillibrary.The email will contain the Name,BikeId,LoanStartTimeandLoanRateof the loan.
Given below is an example usage scenario and how the reminder email mechanism behaves at each step.
Step 1. The user launches the application for the first time. The user’s email address is invalid by default.
Step 2. The user executes checkemail. The following sequence diagram shows how checkemail works:

The command executes Model#getMyEmail(), which calls UserPrefs#getDefaultEmail() and returns user’s email stored in UserPref. The app checks if user’s email equals to "default". In this case, they are equal, so it throws a CommandException.
Step 3. The user executes setemail e/EMAIL x/PASSWORDFORAPP. This command does a few checks first:
-
The app then checks if
EMAILequals to the user email that has been already set to the app. If so, then aCommandExceptionis thrown, to warn the user that they are setting the same email as last time. -
Otherwise,
SetEmailCommand#isValidGmail(EMAIL)is called to check ifEMAILis a valid gmail. If not, aCommandExceptionis thrown to warn the user that they are setting invalid email address.
Step 4. The user forgets what email has been set before, so the user executes checkemail again. The procedure is the same as in Step 2. However, the app detects that user’s email is not the default invalid string this time, so it creates an Email(userEmail) object and executes Email#getCensored(). Then, the function returns a CommandResult with a success message and the censored user email.
Step 5. The user sends a reminder email to a customer by executing remind pw/EMAILPASSWORD id/LOAN_ID. This command implements the following operations:
-
Execute
Model#getLoanById()and return an optional<Loan> object calledtargetLoan. -
Check if
targetLoan.isPresent()returns a non-nullloan, then check if itsLoanStatusisONGOING. -
If its
LoanStatusisONGOING, create aSendReminder(model, EMAILPASSWORD, loan)object and executeSendReminder#send()to send email.
TheSendReminder#send()method callsSendReminder#createReminderEmail(session, userEmail)to create the content of the email, connects user’s email usingEMAILPASSWORDand finally send the email.For Steps (b), if the next step cannot be executed, a CommandExceptionwith corresponding failure message will be thrown.If it throws a CommandExceptionwith authentication failed message in step (c), please check if user’s email and password are correct. If they are, please make sure that theLess secure appssetting of user’s email is enabled. If it is not, enable it and refresh the page.
3.10.2. Design considerations
Aspect: use user’s personal email vs share an immutable common email
-
Alternative 1 (current choice): Use a user-specified email.
-
Pros:
-
The user has a choice of what email address to use.
-
The user needs to type in the correct password if they want to send a reminder email, which ensures the security and privacy of the email.
-
-
Cons:
-
The user needs to enable the
Less secure appssetting, which could be a security concern.
-
-
-
Alternative 2: Use a common email provided by the app.
-
Pros:
-
The user does not need to set their own email when sending reminder emails, reducing hassle when setting up.
-
The user does not need to type in a password when sending a reminder email.
-
-
Cons:
-
The common email is less secure, as its password can be found within the program.
-
The password of the common email can be changed by malicious users.
-
The email might get overloaded.
-
Customers might receive spam emails, as the
remindcommand does not require a password.
-
-
3.10.3. Future considerations
We plan to add a feature that can automatically send an e-receipt to the customer after return ing a loan.
The e-receipt will contain the Name, BikeID, LoanStartTime, LoanEndTime and TotalCost of the loan.
3.11. [Proposed] Improved delete functionality
3.11.1. Current Implementation
When the user deletes a loan from the LoanBook, it deletes the correct loan, then commits the result into memory. What this entails is that the entire XML file gets overwritten when each delete command is being called.
3.11.2. Proposed implementation:
From above, there is already a LoanStatus that has been implemented. What this does is that it allows the loan to be marked as deleted by setting the enum to the appropriate value. This would result in the LoanBook not needing to recommit every change.
From here, when the user decides to close the LoanBook, it will then loop through all the loans and filter out the ones which have not been deleted. These are the loans that would be kept and saved in the LoanBook.
3.11.3. Design Considerations
Aspect: Deleting a loan
-
Alternative 1 (current choice): Remove each loan as they are deleted
-
Pros: Easy to implement
-
Cons: Large time taken for memory operations as reading and writing to the data is required.
-
-
Alternative 2 (proposed implementation): Use an enum to implement lazy deletion.
-
Pros: Much more time efficient due to lazy deletion
-
Cons: Implementation is harder, and changing to this implementation would affect the undo and redo features.
-
-
Alternative 3: Fix the LoanBook storage manager so that it does not rewrite the entire XML file after each delete operation.
-
Pros: All operations are now lazy. Much better performance of the application because commit operations do not need to change the large XML file.
-
Cons: Large refactoring work required. May potentially affect the timeline of development of the other functions.
-
4. Documentation
This section describes the way we document our project. We use asciidoc for writing documentation.
| We chose asciidoc over Markdown because asciidoc, although a bit more complex than Markdown, provides more flexibility in formatting. |
4.1. Editing Documentation
See UsingGradle.adoc to learn how to render .adoc files locally to preview the end result of your edits.
Alternatively, you can download the AsciiDoc plugin for IntelliJ, which allows you to preview the changes you have made to your .adoc files in real-time.
4.2. Publishing Documentation
See UsingTravis.adoc to learn how to deploy GitHub Pages using Travis.
4.3. Converting Documentation to PDF format
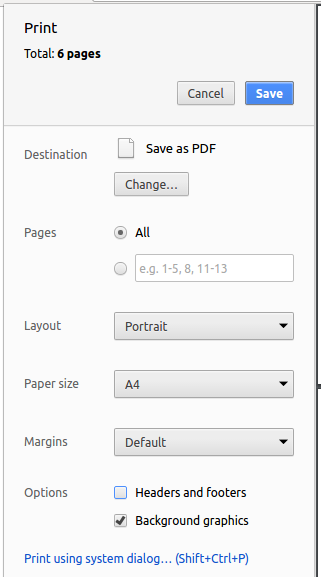
We use Google Chrome for converting documentation to PDF format, as Chrome’s PDF engine preserves hyperlinks used in webpages.
Here are the steps to convert the project documentation files to PDF format.
-
Follow the instructions in UsingGradle.adoc to convert the AsciiDoc files in the
docs/directory to HTML format. -
Go to your generated HTML files in the
build/docsfolder, right click on them and selectOpen with→Google Chrome. -
Within Chrome, click on the
Printoption in Chrome’s menu. -
Set the destination to
Save as PDF, then clickSaveto save a copy of the file in PDF format. For best results, use the settings indicated in the screenshot below.
4.4. Site-wide Documentation Settings
The build.gradle file specifies some project-specific asciidoc attributes which affects how all documentation files within this project are rendered.
Attributes left unset in the build.gradle file will use their default value, if any.
|
| Attribute name | Description | Default value |
|---|---|---|
|
The name of the website. If set, the name will be displayed near the top of the page. |
not set |
|
URL to the site’s repository on GitHub. Setting this will add a "View on GitHub" link in the navigation bar. |
not set |
|
Define this attribute if the project is an official SE-EDU project. This will render the SE-EDU navigation bar at the top of the page, and add some SE-EDU-specific navigation items. |
not set |
4.5. Per-file Documentation Settings
Each .adoc file may also specify some file-specific asciidoc attributes which affects how the file is rendered.
Asciidoctor’s built-in attributes may be specified and used as well.
Attributes left unset in .adoc files will use their default value, if any.
|
| Attribute name | Description | Default value |
|---|---|---|
|
Site section that the document belongs to.
This will cause the associated item in the navigation bar to be highlighted.
One of: * Official SE-EDU projects only |
not set |
|
Set this attribute to remove the site navigation bar. |
not set |
4.6. Site Template
The files in docs/stylesheets are the CSS stylesheets of the site.
You can modify them to change some properties of the site’s design.
The files in docs/templates controls the rendering of .adoc files into HTML5.
These template files are written in a mixture of Ruby and Slim.
|
Modifying the template files in |
5. Testing
We write extensive tests to prevent regression and allow other developers to build on our work without fear of breaking other parts. This section provides the necessary steps to run tests.
5.1. Running Tests
There are three ways to run tests.
| The most reliable way to run tests is the 3rd one. The first two methods might fail some GUI tests due to platform/resolution-specific idiosyncrasies. |
Method 1: Using IntelliJ JUnit test runner
-
To run all tests, right-click on the
src/test/javafolder and chooseRun 'All Tests' -
To run a subset of tests, you can right-click on a test package, test class, or a test and choose
Run 'ABC'
Method 2: Using Gradle
-
Open a console and run the command
gradlew clean allTests(Mac/Linux:./gradlew clean allTests)
| See UsingGradle.adoc for more info on how to run tests using Gradle. |
Method 3: Using Gradle (headless)
Thanks to the TestFX library we use, our GUI tests can be run in the headless mode. In the headless mode, GUI tests do not show up on the screen. That means the developer can do other things on the Computer while the tests are running.
To run tests in headless mode, open a console and run the command gradlew clean headless allTests (Mac/Linux: ./gradlew clean headless allTests)
5.2. Types of tests
We have two types of tests:
-
GUI Tests - These are tests involving the GUI. They include,
-
System Tests that test the entire App by simulating user actions on the GUI. These are in the
systemtestspackage. -
Unit tests that test the individual components. These are in
loanbook.uipackage.
-
-
Non-GUI Tests - These are tests not involving the GUI. They include,
-
Unit tests targeting the lowest level methods/classes.
e.g.loanbook.commons.StringUtilTest -
Integration tests that are checking the integration of multiple code units (those code units are assumed to be working).
e.g.loanbook.storage.StorageManagerTest -
Hybrids of unit and integration tests. These test are checking multiple code units as well as how the are connected together.
e.g.loanbook.logic.LogicManagerTest
-
|
The tests within the In this case, we commented out the check for equality of the string from the |
|
However we do not need to test the equality of the displayed strings to ensure that the An alternative would be to use a regex to do string pattern matching on the added |
5.3. Troubleshooting Testing
Problem: HelpWindowTest fails with a NullPointerException.
-
Reason: One of its dependencies,
HelpWindow.htmlinsrc/main/resources/docsis missing. -
Solution: Execute Gradle task
processResources.
6. Dev Ops
This sections provides a brief summary of the tools we use in the project, and how to integrate them into the project.
6.1. Build Automation
See UsingGradle.adoc to learn how to use Gradle for build automation.
6.2. Continuous Integration
We use Travis CI and AppVeyor to perform Continuous Integration on our projects. See UsingTravis.adoc and UsingAppVeyor.adoc for more details.
6.3. Coverage Reporting
We use Coveralls to track the code coverage of our projects. See UsingCoveralls.adoc for more details.
6.4. Code Quality
We use Codacy to track the code quality of our projects. See UsingCodacy.adoc for more details.
6.5. Documentation Previews
When a pull request has changes to asciidoc files, you can use Netlify to see a preview of how the HTML version of those asciidoc files will look like when the pull request is merged. See UsingNetlify.adoc for more details.
6.6. Making a Release
Here are the steps to create a new release.
-
Update the version number in
MainApp.java. -
Generate a JAR file using Gradle.
-
Tag the repo with the version number. e.g.
v0.1 -
Create a new release using GitHub and upload the JAR file you created.
6.7. Managing Dependencies
A project often depends on third-party libraries. For example, Loan Book depends on the Jackson library for XML parsing. Managing these dependencies can be automated using Gradle. For example, Gradle can download the dependencies automatically, which is better than these alternatives.
a. Include those libraries in the repo (this bloats the repo size)
b. Require developers to download those libraries manually (this creates extra work for developers)
Appendix A: Product Scope
LoanBook targets users who run a bicycle rental business in Singapore. Users who will find this product especially useful are those who are familiar with desktop applications, and who prefer using a command-line interface (CLI) over a graphic user interface (GUI) for input. A reason for this preference is that using a mouse to access app features may be slower and more accident-prone than typing on a keyboard.
Appendix B: User Stories
Priorities: High (must have) - * * *, Medium (nice to have) - * *, Low (unlikely to have) - *
| Priority | As a … | I want to … | So that I can… |
|---|---|---|---|
|
bicycle rental shop owner who wants to manage my bicycles |
register my bicycles into the app |
keep track of my bicycles within the app |
|
bicycle rental shop owner who wants to manage my bicycles |
edit details for my bicycles within the app |
update the system with the latest bicycle statuses (e.g. got damaged, repaired, changed name or ID) |
|
bicycle rental shop owner who wants to manage my bicycles |
remove bicycles from the app |
reflect the decommissioning of bicycles in the app |
|
bicycle rental shop owner who wants to manage my bicycles |
track the features of my bicycles (e.g. wheel size, gears, has a bell) |
search for particular bicycles or types of bicycles better, especially when serving customers |
|
bicycle rental shop owner who wants to manage my bicycles |
mark a bicycle with a repair end date |
I can be reminded by the app on when to collect my bike from the repairman |
|
bicycle rental shop owner who wants to manage my loans |
initiate new loans into the app |
keep track of my loans within the app |
|
bicycle rental shop owner who wants to manage my loans |
edit a loan’s details |
correct a typo or adapt to a customer’s change of mind |
|
bicycle rental shop owner who wants to manage my loans |
register the completion of a loan (i.e. return of the bike) in the system |
update the system (make the bike available again, receive payment etc.) |
|
bicycle rental shop owner who wants to manage my loans |
cancel a loan |
update the system in case the loan is invalidated (e.g. the customer changes their mind) |
|
bicycle rental shop owner who wants to manage my loans |
be automatically notified and given details if the same customer tries to rent two bikes simultaneously |
not loan out another bicycle to a customer who has not returned their previous bike |
|
bicycle rental shop owner who wants to manage my loans |
be automatically notified and given details if two customers try to loan the same bike simultaneously |
not loan out an already loaned bike |
|
bicycle rental shop owner who wants to manage my bicycles and loans |
view a list of all bicycles or loans |
get a big picture of my current state |
|
bicycle rental shop owner who wants to manage my bicycles and loans |
choose to view the full details of a particular bicycle or loan |
get details about a particular bicycle or loan as needed or desired |
|
bicycle rental shop owner who wants to manage my bicycle paraphernalia |
tag loans that loan additional items (e.g. helmets, attachable headlights) |
keep track of which transactions concern them |
|
bicycle rental shop owner who wants to accommodate customer demands |
register rentals in advance and reserve bicycles |
be reminded of reservations, and not accidentally loan the bicycle out thus becoming unable to meet the reservation |
|
bicycle rental shop owner who wants to manage my loans |
see at a glance what loans are overdue |
automatically remind people who are still in possession of my bicycles to return them |
|
bicycle rental shop owner who wants to manage my loans |
get an automatic reminder when a loan is overdue |
contact the customer to tell them that their time is up |
|
bicycle rental shop owner that has to deal with an overdue loan |
view the contact details of bicycle loaners |
contact them to check on their (and my bicycle’s) status |
|
bicycle rental shop owner |
view past loans of my bicycles |
analyze my own history or present records for whatever purpose (accounting, investigation, legal etc.) |
|
bicycle rental shop owner |
view loan activity over a specific period of time (e.g. Jun to Aug 2018) |
analyze my own history for a focussed period of time |
|
bicycle rental shop owner who wants to optimize my business |
see which bicycles are the least popular to be rented |
investigate them for issues or possibly decommission them |
|
bicycle rental shop owner who is proficient with a CLI |
use a CLI for all operations within the app |
give commands faster and with less error |
|
bicycle rental shop owner who wants to meet customer demands promptly |
readily view a list of available bicycles |
make recommendations to customers to serve them faster |
|
bicycle rental shop owner who wants to manage my bicycles and loans |
have my list of bicycles or loans sorted (by name, date etc.) |
search for a particular entry much more easily |
|
bicycle rental shop owner who wants to manage my bicycles and loans |
filter my list of bicycles or loans with a keyword |
search for a particular entry much more easily |
|
bicycle rental shop owner who wants to manage my bicycles and loans |
view only a subset of my bikes or loans with entries in a particular range (e.g. date, loan rate) |
search for a particular entry much more easily |
|
bicycle rental shop owner who wants to make returning a bike easy |
automatically calculate the correct amount of money based on the time they loaned the bike for |
I don’t have to calculate the cost manually, and thus be faster with less mistakes |
|
bicycle rental shop owner who wants to manage my bicycles |
add tags to bicycles |
categorize and later search for them more easily |
|
bicycle rental shop owner who wants to manage my bicycles and loans |
undo and redo recent changes in the app |
quickly recover in the event of a command mistake |
|
bicycle rental shop owner who wants to expand my service capabilities |
access the same data on different machines simultaneously |
manage multiple service counters efficiently and accurately |
|
bicycle rental shop owner who wants to expand my service capabilities |
hook the app up with the national database |
automatically retrieve some customer details (e.g. name, gender) when I type in their NRIC |
|
bicycle rental shop owner who wants to expand my service capabilities |
integrate the app with an NRIC barcode scanner |
automate entering a customer’s details |
|
bicycle rental shop owner who respects my customer’s privacy |
partially or fully hide some of the customers’ personal data (e.g. NRIC, phone) |
minimize the chance of leaking those details out to third parties |
|
bicycle rental shop owner who is concerned about the data’s security |
encrypt the app’s data |
ensure no one can access or modify it with third-party software |
|
bicycle rental shop owner who is concerned about the data’s security |
set a username and password for accessing the app |
lock unknown parties out from the app |
|
bicycle rental shop owner who is concerned about the data’s security |
prompt the user (myself) for a confirmation or a password before I delete entries |
prevent accidental or hasty deletions of data |
|
bicycle rental shop owner who is concerned about the data’s security |
back-up the app’s data |
recover quickly in the case of data corruption or just general data unavailability |
|
new or inexperienced user |
readily access the Help page for the app |
have a quick and comprehensive reference on how to get started and do things |
|
new or inexperienced user |
see command usage instructions whenever I mistype |
correct myself on the spot |
Appendix C: Use Cases
(For all use cases below, the System is the LoanBook and the Actor is the user, unless specified otherwise)
Use case: Delete loan
MSS
-
User requests to list loans.
-
LoanBook shows a list of loans.
-
User requests to delete a loan in the list by specifying a list index and the app’s password.
-
LoanBook deletes the loan.
-
LoanBook displays a prompt to the user indicating success.
Use case ends.
Extensions
-
2a. The list is empty.
Use case ends.
-
3a. The given index is invalid.
-
3a1. LoanBook shows an error message.
Use case resumes at step 2.
-
-
4a. The given password is invalid.
-
3a1. LoanBook shows an error message.
Use case resumes at step 2.
-
Use case: Add a bike into loan book
MSS
-
User requests to add a bike with the specific parameters into the LoanBook.
-
LoanBook adds the bike.
-
LoanBook displays a prompt to the user indicating success.
Use case ends.
Extensions
-
1a. The user input is not of the correct format.
-
1a1. LoanBook shows an error message giving the user an example command, as well as correct format of the command.
-
-
1b. Any one of the inputs fails their respective validation checks.
-
1b1. LoanBook shows an error message telling the user how to rectify their command.
Use case ends.
-
Use case: Add a loan into loan book
MSS
-
User requests to add a loan with the specific parameters into the LoanBook.
-
LoanBook adds the loan.
-
LoanBook displays a prompt to the user indicating success.
Use case ends.
Extensions
-
1a. The user input is not of the correct format.
-
1a1. LoanBook shows an error message giving the user an example command, as well as correct format of the command.
-
-
1b. Any one of the inputs fails their respective validation checks.
-
1b1. LoanBook shows an error message telling the user how to rectify their command.
Use case ends.
-
Use case: Mark a loan as returned in the LoanBook
MSS
-
User requests to search for a loan with a specific name or tag.
-
LoanBook shows a list of loans that fulfills the condition.
-
User requests to return a specific loan from the list by specifying a
LoanID. -
LoanBook marks the loan as returned.
-
LoanBook prompts the user to charge the customer a certain amount of money, based on the prevailing rates and rental times in the loan book.
Use case ends.
Extensions
-
2a. The list is empty.
-
2a1. LoanBook feedbacks to the user that no loans fulfilling the condition were found.
Use case ends.
-
3a. The given LoanID is invalid.
-
3a1. LoanBook shows an error message.
-
-
3b. The loan at the given LoanID has been returned.
-
3b1. LoanBook shows an error message, stating the time which the loan has been returned.
Use case resumes at step 2.
-
Use case: Reset the entire loanbook
MSS
-
User requests to reset the loanbook.
-
LoanBook prompts the user for their password.
-
User enters the correct password.
-
LoanBook clears its entire history of loans.
Use case ends.
Extensions
-
3a. The user inputs an incorrect password.
-
3a1. LoanBook shows an error message telling the user that the password that they entered is incorrect.
Use case ends.
-
Use case: Give a summary of all transactions
MSS
-
User requests for a summary of all transactions.
-
LoanBook gives a summary of all the transactions that that had happened.
Use case ends.
Appendix D: Non Functional Requirements
-
Should work on any mainstream OS as long as it has Java
9or higher installed. -
Should be able to hold up to 1000 loans without a noticeable sluggishness in performance for typical usage.
-
A user with above average typing speed for regular English text (i.e. not code, not system admin commands) should be able to accomplish most of the tasks faster using commands than using the mouse.
{More to be added}
Appendix F: Instructions for Manual Testing
Given below are instructions to test the app manually.
| These instructions only provide a starting point for testers to work on; testers are expected to do more exploratory testing. |
If this is your first time using the app, note that the default password of the app is set to a12345.
|
F.1. Launch and Shutdown
-
Initial launch
-
Download the jar file and copy into an empty folder
-
Double-click the jar file
Expected: Shows the GUI with a set of sample contacts. The window size may not be optimum.
-
-
Saving window preferences
-
Resize the window to an optimum size. Move the window to a different location. Close the window.
-
Re-launch the app by double-clicking the jar file.
Expected: The most recent window size and location is retained.
-
F.2. Adding a bike
-
Adding a bike whose name contains alphanumeric characters, spaces, and hyphens
-
Prerequisites: List all bikes using the
listbikescommand. -
Test case:
addbike B i-k e 0 01-
Expected: Bike B i-k e 0 01- is added to the bike list. Details of the updated bike is shown in the status message. Timestamp in the status bar is updated.
-
-
Adding a bike that already exists in the bike list
-
Prerequisites: List all bikes using the
listbikescommand.Bike1exists in the list. -
Test case:
addbike Bike1
Expected: No bike is added as a bike with the same name already exists within the LoanBook. Error details shown in the status message. Status bar remains the same.
-
F.3. Adding a loan
-
Adding a loan while all loans are listed
-
Prerequisites: List all loans using the
listcommand. Multiple loans in the list. A Bike with the nameBike001is present in the Loanbook. The last used Loan ID is smaller than 999,999,999, or the Loanbook is new. -
Test case:
add n/David ic/T0248272F p/98765432 e/david@example.com b/Bike001 lr/3.5 t/Overnight
Expected: A new loan is added to the list.-
The editable details of the loan (e.g. Name, NRIC, etc.) match the fields specified in the command.
-
The Loan ID of the new loan is larger than that of all existing loans.
-
The "Start Time" field is equal to the time of execution of the
addcommand. -
The tags that appear are "Ongoing" and "Overnight".
-
-
-
Adding a loan with a bike that does not exist
-
Prerequisites: A bike with the name
MissingBikedoes not exist in the Loanbook. -
Test case:
add n/David ic/T0248272F p/98765432 e/david@example.com b/MissingBike lr/3.5 t/Overnight
Expected: No new loan is created. The following error message should appear: "No bike with that name exists within the loan book."
-
F.4. Edit a bike
-
Editing a bike while all bikes are listed
-
Prerequisites: List all bikes using the
listbikescommand.BikeToRename,Bike001andBike002are in the list. -
Test case:
editbike BikeToRename n/New Bike
Expected: The bikeBikeToRenamewill be renamed to "New Bike". Details of the updated bike is shown in the status message. Timestamp in the status bar is updated. -
Test case:
editbike Bike002 n/Bike001
Expected: No bike is edited due to the specified name matching that of an existing bike, thus creating a duplicate bike if the command proceeds. Error details shown in the status message. Status bar remains the same. -
Test case:
editbike ThisBikeDoesNotExist n/New Bike
Expected: No bike is edited due to the specified name not matching that of any existing bike. Error details shown in the status message. Status bar remains the same. -
Other incorrect delete commands to try:
editbike
Expected: Similar to previous.
-
F.5. Deleting a bike
-
Deleting a bike while all bikes are listed
-
Prerequisites: List all bikes using the
listbikescommand.Bike001andB i-k e 0 01-are in the list. -
Test case:
deletebike B i-k e 0 01- x/a12345
Expected: The bikeB i-k e 0 01-is deleted from the list. Details of the deleted bike is shown in the status message. Timestamp in the status bar is updated. -
Test case:
deletebike NotAnExistingBike x/a12345
Expected: No bike is deleted due to the supplied name not referring to an existing bike. Error details shown in the status message. Status bar remains the same. -
Test case:
deletebike Bike001 x/wr0ngP4sS
Expected: No bike is deleted due to invalid password supplied. Error details shown in the status message. Status bar remains the same. -
Other incorrect delete commands to try:
deletebike
Expected: Similar to previous.
-
F.6. Deleting a loan
-
Deleting a loan while all loans are listed
-
Prerequisites: List all loans using the
listcommand. Multiple loans in the list. -
Test case:
delete i/1 x/a12345
Expected: First contact is deleted from the list. Details of the deleted contact shown in the status message. Timestamp in the status bar is updated. -
Test case:
delete i/0 x/a12345
Expected: No loan is deleted due to invalid index supplied. Error details shown in the status message. Status bar remains the same. -
Test case:
delete i/1 x/wr0ngP4sS
Expected: No loan is deleted due to invalid password supplied. Error details shown in the status message. Status bar remains the same. -
Other incorrect delete commands to try:
delete,delete i/x x/a12345(where x is larger than the list size)
Expected: Similar to previous.
-
F.7. Changing password
-
Changing the password of the application
-
Prerequisites: Both existing and new password should be alphanumeric of length between 6 and 10 inclusive. Existing password is currently
a12345. -
Test case:
setpass wrongPass newWorld
Expected: Password remains the same as current password entered is wrong. -
Test case:
setpass a12345
Expected: Password remains the same as new password entered is not alphanumeric. -
Test case:
setpass a12345 newPass
Expected: Password is now changed tonewPass. -
Other incorrect setpass commands to try:
setpass,setpass a12345.
-
F.8. Search loans
-
Search loans within a specific time frame
-
Prerequisites: Input date is of the correct format (YYYY-MM-DD)
-
Test case:
search 2018-01-01 2018-01-01Expected: Shows loan that was created on 2018-01-01. -
Test case:
search 2018-02-30 2018-02-30Expected: Does not filter loans as 2018-02-30 is not a valid date. -
Test case:
search 2018-01-02 2018-01-01Expected: Does not filter loans as start date should be before end date. -
Test case:
search 2018-01-01 2018-12-31Expected: Shows all loan created in year 2018. -
Other incorrect search commands to try:
search,search 2018-01-01.
-
F.9. Return a loan functionality
Prerequisites: List all loans using the list command. Ensure there are multiple loans in the list.
-
Returning a valid loan
-
Choose a loan that has not been returned. These loans are marked with the ONGOING tag. Find the index number of it and run
return i/<INDEX>.
Expected: The loan is returned successfully. The display message details that the loan has been deleted, and gives a suggestion for the cost price of the duration of the loan. -
Choose another ongoing loan from the list and run
return i/<INDEX>.
Expected: The loan is returned successfully as well. The display message details that the loan has been deleted, and gives a suggestion for the cost price of the duration of the loan.
-
-
Negative tests:
-
Test case:
return i/0
Expected: No loan is returned. Error details shown in the status message, the message should say "the specified index is invalid" in this case. Status bar remains the same. -
Other incorrect
returncommands to try:-
return -
return i/x(wherexis larger than the list size) -
return i/aaa(Whereaaais a string) -
return i/y(whereyis the index of a loan that is notONGOING).
-
-
F.10. Summary functionality
Use the summary command on various sizes of the LoanBook to test this functionality
-
Create an empty LoanBook and run the
summarycommand.
Expected: The summary should report the following:-
Total loans: 0
-
Loans in progress: 0
-
Returned loans: 0
-
Total product loan time: 0 minutes
-
Total revenue: $0.00
-
-
Add 1 loan with a rate of $30/hr. Run the
summarycommand.
Expected: The displayed page should report the following:-
Total loans: 1
-
Loans in progress: 1
-
Returned loans: 0
-
Total product loan time: 0 minutes
-
Total revenue: $0.00
-
-
Add 3 more loans with rates $120/hr. Run the
summarycommand.
Expected: The displayed page should report the following:-
Total loans: 4
-
Loans in progress: 4
-
Returned loans: 0
-
Total product loan time: 0 minutes
-
Total revenue: $0.00
-
-
Return the first loan that you have added from above after exactly 1 minute, and run the
summarycommand.
Expected: The displayed page should report the following:-
Total loans: 4
-
Loans in progress: 3
-
Returned loans: 1
-
Total product loan time: 1 minutes
-
Total revenue: $0.50
-
-
Return 2 of the 3 loans that you have added from above after exactly 1 and 2 minutes from when you added them, respectively. Run the
summarycommand.
Expected: The displayed page should report the following:-
Total loans: 4
-
Loans in progress: 1
-
Returned loans: 3
-
Total product loan time: 4 minutes
-
Total revenue: $6.50
-
F.11. Sending Reminder Emails
Prerequisites: Make sure the system is connected to the network and the network allows smtp. The email must be gmail and its Less secure apps option is enabled.
-
Send a reminder email successfully. Please follow these steps:
-
adda loan with a valid customer’s email (but you own it of course). -
Execute the
checkemailcommand. Then use thesetemailcommand to set the sender’s email. -
After that, execute
remind pw/CORRECTWMAILPW id/ONGOING_LOAN_ID.
-
Expected: Receive a success message "Email sent!" on the screen. A reminder email should have been sent from the sender’s email (check the Sent folder). The same email should also be in the inbox of the customer’s email account that you have set.
-
Negative tests:
-
Test case:
setemail e/OLD.EMAIL@gmail.com x/PASSWORDFORAPP
Expected: Failure message "The new email should not be the same as the old email!" will show. User’s email is not changed. -
Test case:
setemail e/NEW.EMAIL@outlook.com x/PASSWORDFORAPP
Expected: Failure message "Your new email address must be valid gmail." will show. User’s email is not changed. -
Test case:
remind pw/CORRECTPASSWORD id/NON_EXIST_ID
Expected: Failure message "There is no Loan with this ID in the LoanBook!" will show. The email is not sent. -
Test case:
remind pw/CORRECTPASSWORD id/RETURNED_ID
Expected: Failure message "There is no need to send a reminder, because the loan is RETURNED" will show. The email is not sent. -
Test case:
remind pw/WRONGPASSWORD id/VALID_LOAN_ID
Expected: Failure message "Your password might be incorrect, or you have not enabled the \"Less secure apps\" setting in your Google account settings. Please refer to the User Guide by pressing F1!" will show. The email is not sent. -
Test case: Make sure your email is set, disable its
less secure appssetting and refresh the setting page. Executeremind pw/CORRECTPASSWORD id/VALID_LOAN_ID
Expected: Failure message "Your password might be incorrect, or you have not enabled the \"Less secure apps\" setting in your Google account settings. Please refer to the User Guide by pressing F1!" will show. The email is not sent. -
Test case: Disconnect your network. Execute
remind pw/CORRECTPASSWORD id/VALID_LOAN_ID
Expected: Failure message "No connection to the network!" will show. The email is not sent. -
Other incorrect commands to try:
setemail,setemail x(where x can be any string),remind,remind x y z(no prefix, x, y and z can be any string).
-