Overview
LoanBook is a desktop application that helps bicycle rental shop owners in Singapore keep track of their bicycles and bicycle rental transactions. The user interacts with LoanBook using a command line interface (CLI), and receives feedback through a graphic user interface (GUI) that is created with the JavaFX library. The codebase is written in Java, and has about 25 kLoC.
The LoanBook project was morphed from an existing codebase by a team of 5 NUS Computing students including myself, as part of the curriculum for the CS2103T Software Engineering module.
This portfolio documents my contributions to the LoanBook project.
Summary of contributions
-
Major enhancement: Added the ability to track bicycles
-
Functionality: This enhancement allows the user to register and edit bicycles within the app.
-
Justification: By tracking the status of bicycles, the management of rentals also becomes easier as it is clearer exactly what choices of bicycles are available, and what actions should not be allowed. This feature improves the product significantly because it can help the user catch mistakes or dangerous situations in rentals before they cause a problem.
-
Highlights: This enhancement goes further than just duplicating the existing code for loans, as many areas which used to handle only one list or set now have to handle two. As the purpose of this feature is partly to help with the validation of loans, additional checks also had to be integrated into the app and the commands. In touching the various components, I had to learn about the structure of the code base as well as the various tools used such as Git, FXML and CSS and how they integrate with Java.
-
-
Other contributions:
-
Project management:
-
Managed releases
v1.3-v1.4(2 releases) on GitHub
-
-
Enhancements to existing features:
-
Adaptation of code base:
-
Documentation:
-
Updated the class diagrams for the major components of the codebase: #152
-
Explained the model component in the developer guide: #165
-
Explained my major enhancement in the developer guide: #95
-
Updated the product scope in the developer guide: #165
-
Added user stories in the developer guide: #45
-
Contributed to the use cases and manual testing sections in the developer guide: #165
-
-
Community:
-
Contributions to the User Guide
Given below are sections I contributed to the User Guide. They showcase my ability to write documentation targeting end-users. |
Excerpt (Quick Start):
Graphic User Interface (GUI)
A screenshot of the LoanBook app is shown below:
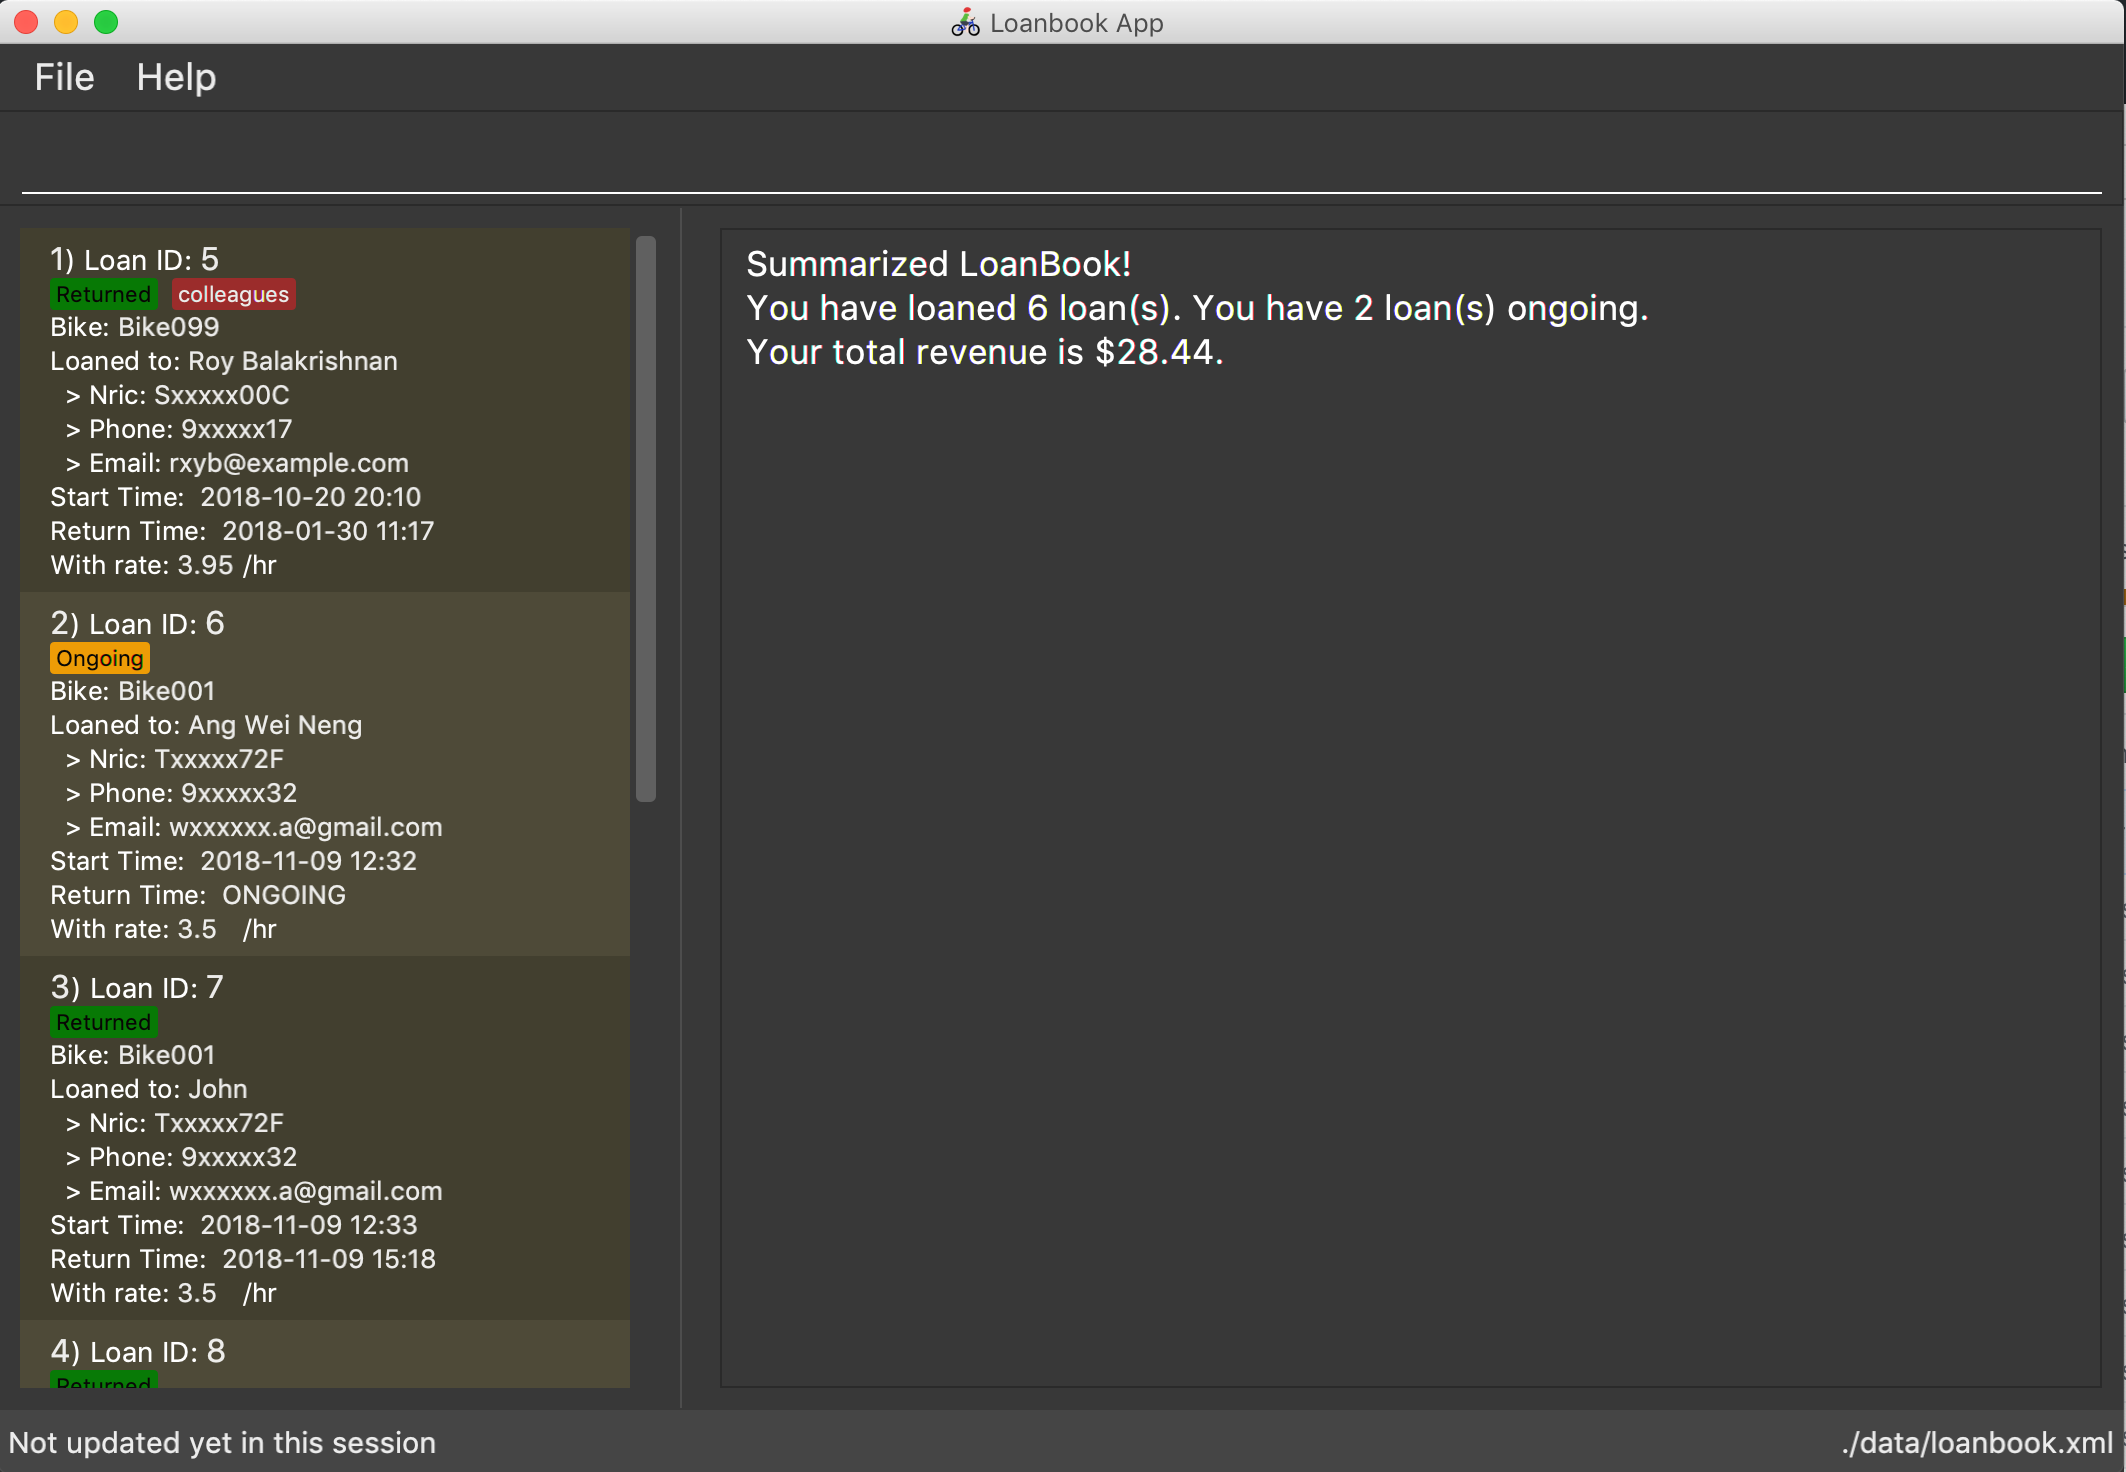
A brief description of each section:
-
At the very top of the window are two dropdown menu s, labelled
FileandHelp. You can access them with the mouse. TheFilemenu allows you to exit LoanBook, while theHelpmenu lets you access this document. -
Right below the dropdown menus is the command box. Here is where you type in the commands to be executed by the app.
-
Below the command box, the space is split horizontally into two sections. The left section is the list panel. Here is where a list of your bikes and loans will appear, together with some individual details on them.
-
The right section is the result display. Whenever you execute a command with the command box, this section will notify you of their outcome by displaying a message.
-
At the bottom of the window is the status bar. It contains two texts. The text on the left displays when was the last time the LoanBook’s data was saved to the hard disk. The text on the right displays the file path of where the LoanBook data is saved, in relation to LoanBook’s root directory. If the terms here confuse you, you can simply ignore this section.
The command box, list panel and result display are what you will be using the most in LoanBook.
| When you are just starting out, the list panel and result display should be empty as there is no information in the LoanBook yet, so do not worry if you do not see anything there. |
Using Commands
LoanBook uses a Command Line Interface (CLI), which means that it is fully usable with only your keyboard, no mouse required!
When you type in anything on your keyboard, your input should appear in the command box. (If the command box says "Enter command here…" instead, please click on the command box to select it. If you do not have a mouse, press TAB a few times until it is selected.)
The commands in LoanBook follow this format: <KEYWORD> <PARAMETERS…>. As an example, consider the following command: delete i/1 x/a12345
-
deleteis the command’s keyword. The keyword is used to identify which action from the LoanBook is being requested by you. -
i/1 x/a12345specifies the command’s parameters. Parameters are separated by spaces, and each parameter consists of a prefix (e.g.iorx), followed by a forward slash (/), then the value of that parameter (e.g.1ora12345).
| Note that some commands do not use prefixes for their parameters, while others do not even have parameters! Exactly what parameters are needed depends on the specific command, and they are all documented in [Commands]. |
Once you are done entering the command, just press ENTER to execute it. LoanBook will process your command and feedback the result to you using the result display.
| At any time, for a more detailed description of any command used, please check out [Commands]. LoanBook will also remind you of the correct command format should you type anything in incorrectly. So do not worry, there is plenty of help at every step of the way. |
Now that LoanBook is up and running and you are oriented with its GUI, it is time to set up your data within it.
Registering Your Bicycles Into LoanBook
Before LoanBook can do anything, it needs to know what bicycles you have at your disposal.
To register a bike into LoanBook, use the following command:
addbike n/BIKE_NAME
where BIKE_NAME is the name of your bicycle. It will be used to identify your bike, so it must be a unique name. Your bicycle’s ID number can be a good fit for this field.
On success, you should see a message in the result display saying: "New bike added: BIKE_NAME Status: Available". If you receive an error, follow the instructions in the result display and try again.
Even though you have successfully registered a bicycle into LoanBook, you might be disappointed that nothing is appearing in the list panel. That is because LoanBook defaults to showing you the list of loans in the list panel, and you currently do not have any. To view the list of bikes instead, use the command listbikes. You should now see a list of the bike(s) that you just keyed in!
|
Simply repeat this process until you have registered all your bikes within LoanBook.
Renting Out Bicycles
Now that you have some bicycles within LoanBook, you can rent them out using the add command. The format for the add command is as follows:
add n/NAME ic/NRIC p/PHONE e/EMAIL b/BIKE lr/LOANRATE [t/TAG]…
Do not be overwhelmed by the sudden increase in length! Let us take it bit by bit…
-
addis simply the command’s keyword. -
NAMEis the name of the customer who is renting a bike from you, e.g.John Doe. -
NRICis the customer’s NRIC number. -
PHONEis the customer’s phone number, so that you know who to call if your bicycle is not returned on time. -
EMAILis the customer’s email address, so that you can send reminders and e-receipts to them. -
BIKEis the name of the bike that you want to rent out to them. In the previous section, it was mentioned that theBIKE_NAMEthat you specify for a bike is used to identify that bike uniquely; here is where it comes into play. -
LOANRATEis the rate at which you are charging your customer for the bicycle rental, in dollars per hour. This will help your financial calculations later. -
TAGare optional labels that you can tag the loan with. They are simply there to keep better track of your loans, should you wish to use them. You can specify no tags at all, just one tag, or multiple tags (with each tag needing a separatet/prefix).
In summary, most of the parameters you specify here are simply customer-specific data. Once you iron out the details of the rental with them, this command is as easy as any other. Simply fill in the details and you should see a success message: "New loan added: (…)", showing you all the details of the transaction.
Right now, LoanBook should still be displaying the list of bikes. To get it to display the list of loans again, simply use the list command. You should see the new loan you added at the bottom of the list. You can toggle between these two lists at will using the list and listbikes commands.
|
| A further visual cue to help you differentiate whether you are viewing the list of bikes or of loans is that the list of bikes is coloured blue, while the list of loans is coloured yellow-brown. |
Returning Bicycles
Once your customer is done enjoying themself, it is time to conclude the loan. This is done using the return command:
return i/LIST_INDEX
The LIST_INDEX is simply the index of the loan that you want to return in the list panel. It is not the Loan ID.
If the returning is successful, you should see a message in the result display saying "Loan Returned: (…)" followed by the details of the loan. You will also get to see how much you should charge the customer for renting out your bike for as long as they did.
And using LoanBook is as simple as that!
Of course, LoanBook supports a multitude of additional functionalities that will help to facilitate your bicycle rental management even further. The next section lists all the commands that you can try out once you are comfortable with the basic process above. Good luck and happy renting!
Contributions to the Developer Guide
Given below are sections I contributed to the Developer Guide. They showcase my ability to write technical documentation and the technical depth of my contributions to the project. |
Bicycle Management implementation.
Excerpt (Model component):
The model component:
-
Stores the LoanBook data.
-
Stores the user’s preferences.
-
Exposes an unmodifiable
ObservableList<Loan>that can be 'observed' by the UI, so that the UI automatically updates when the data in the model changes. -
Does not depend on any of the other three components.
It allows the following operations:
-
Viewing, adding, modifying and deleting
Bikes andLoans from the LoanBook. -
Retrieving lists of
Bikes andLoans that are registered in the LoanBook, filtered by aPredicate. -
Undo/redo operations.
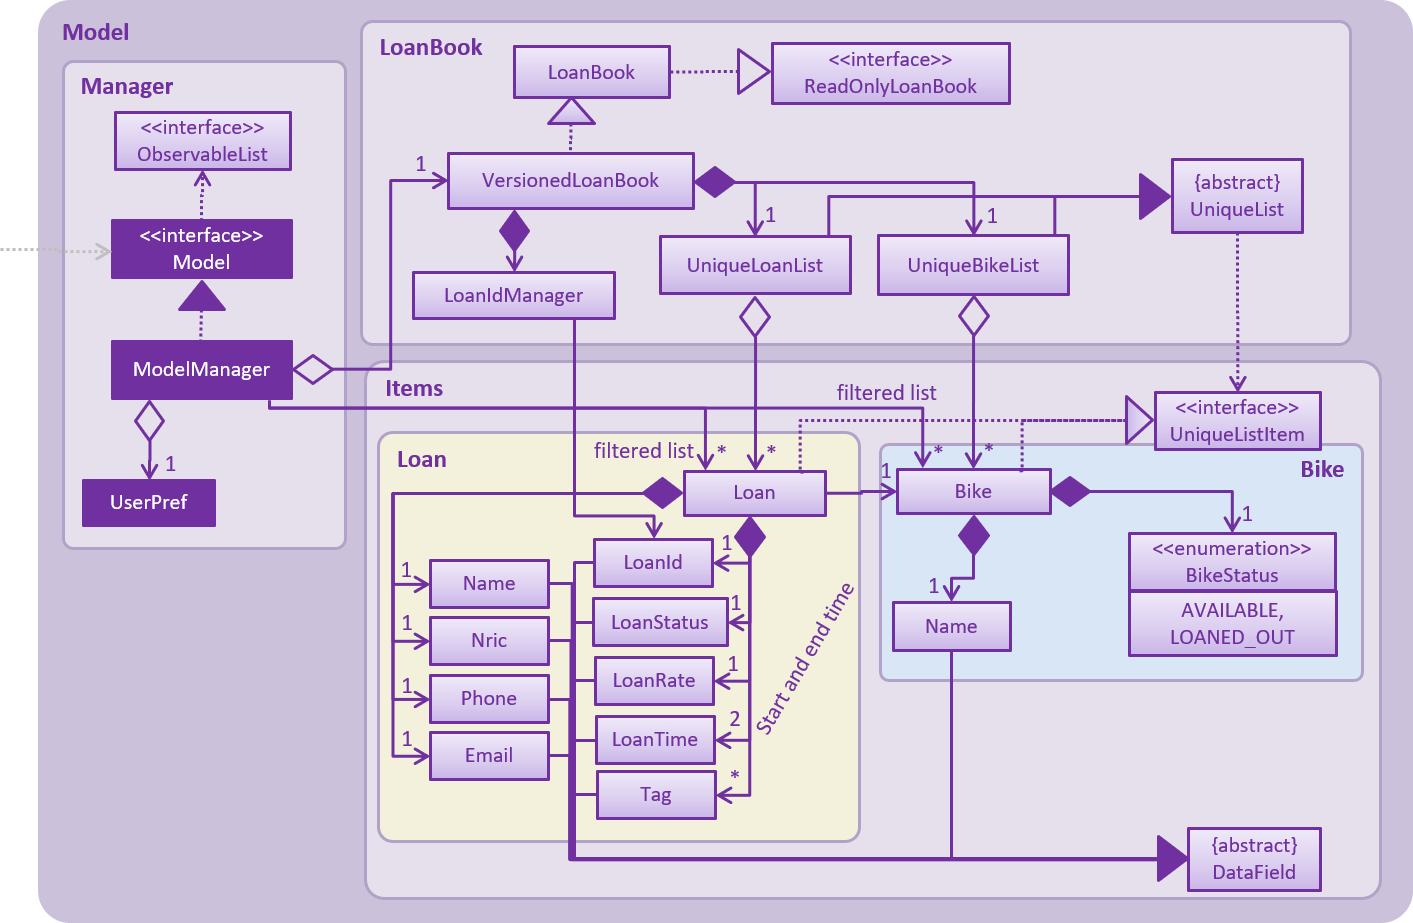
The component’s class diagram is given below:
API file: Model.java
The API is backed by a ModelManager which contains:
-
A
VersionedLoanBookobject which tracks the main data (i.e.Bikes andLoans) within the LoanBook. -
A filtered list each for
Bikes andLoans to expose to the UI. -
A
UserPrefsobject to track the user’s preferences.
Most operations passed to the Model component deal with its VersionedLoanBook. A VersionedLoanBook is simply a regular LoanBook that keeps track of its own history, for the undo/redo operation. The LoanBook itself contains:
-
A
LoanIdManagerthat helps to assign a uniqueLoanIdto everyLoan, so thatLoans may be easily identified. -
A list of unique
Bikes. -
A list of unique
Loans.
|
A unique list in the sense above is a list where no two elements are the "same":
We want to exclude duplicate items from these lists to make sure that identifying any given To facilitate this structure, both the |
Most of the commands passed into the Model are forwarded to its LoanBook, which then executes these commands on the Bike and Loan lists that it has.
A Loan contains:
-
The customer’s particulars: Their
Name,Nric,PhoneandEmail. -
The
Bikethat the customer is renting. -
A
LoanStatusused to signal whether thisLoanisOngoing,ReturnedorDeleted. -
A
LoanIdused for identifying thisLoan. -
A
LoanRatespecifying the rate which the bicycle is being loaned at, in $/hr. -
A
loanStartTimeandloanEndTime, specifying the scheduled start and end times of the loan.loanEndTimemight benullif the loan has no scheduled return time. -
Any number of
Tags to provide additional details for theLoan.
A Bike contains:
-
A
Nameused for identifying thisBike. -
A
BikeStatusreflecting the current status of thisBike, e.g. whether it’s available for rental, loaned out, under repair etc.
Currently, the BikeStatus field within the Bike class is present but not being used for anything. A future use of this field is proposed in the section on Bicycle Management.
|
The DataField class is used to unify the common idea that the above details for Loan s and Bike s are specifiable by a user-inputted string. The only exception is the Bike field in the Loan class, which is specified using the Bike 's Name instead.
|